Setting Up Grouping Rules
General Description
One of the tools that allows optimizing the process of responding to incidents and their analysis is incident grouping.
The essence of grouping lies in combining similar incidents that possess identical characteristics into a single group. This allows transitioning from a scattered list of individual events to a more structured representation, identifying patterns, and simplifying situation analysis.
To implement such behavior, it is necessary to set up grouping rules. The rules determine which specific fields of the incident will be used for comparison and subsequent grouping.
Creating Grouping Rules
To access the rules by which incidents will be grouped, go to Main Menu - Incident Manager section - Grouping Rules Setup.

At the top of the interface, there is a search bar and filters for convenient rule management, as well as a button for creating new rules.
To create a grouping rule:
- Click the
Createbutton at the top of the interface - Fill in the fields in the editor
- Click the
Savebutton at the top or bottom of the interface
Rule Editor
The editor consists of 4 sections: Basic, Comparison Fields, Functional Fields, and Additional Fields.

Basic
In the Basic section, the main grouping parameters are filled in:
Name- the name of the rule that will be displayed in the list of rulesDisplay Name- the name of the incident group in theIncident ManagerDescription- description of the incident group

The fields Displayed Name and Description support tokenization. Tokens are available that contain information about the grouping result:
comparison_fields- indicates which field from theComparison Fieldssection was used for groupingfunction_fields- displays the results of function calculations applied to fields from theFunctional Fieldssectionaggregation_info- stores information about the grouping settings, including the name of the current configurationincidents_count- shows the total number of incidents combined into this group
Besides this, the General section includes the following parameter settings:
Workflow- the workflow that will be used for the groupClosure Statuses- statuses that will be used to close the groupCriticality- the importance level of the incident groupSearch Tasks- search jobs that will be used for grouping (SP tasks are marked with theSP-jobtag)Lifetime- the lifetime of the incident groupMaximum Time Between Incidents- the maximum time between incidents for groupingSynchronize with new incidents- switch

Detail Type
- Search
- Link
Mechanism for setting initial conditions for an analytical report, which serves as an entry point for subsequent (drilldown) operations.
The Specify time boundaries for drilldown switch is a specialized configuration parameter for Search that determines how the time filter will be applied when performing (drilldown) operations.
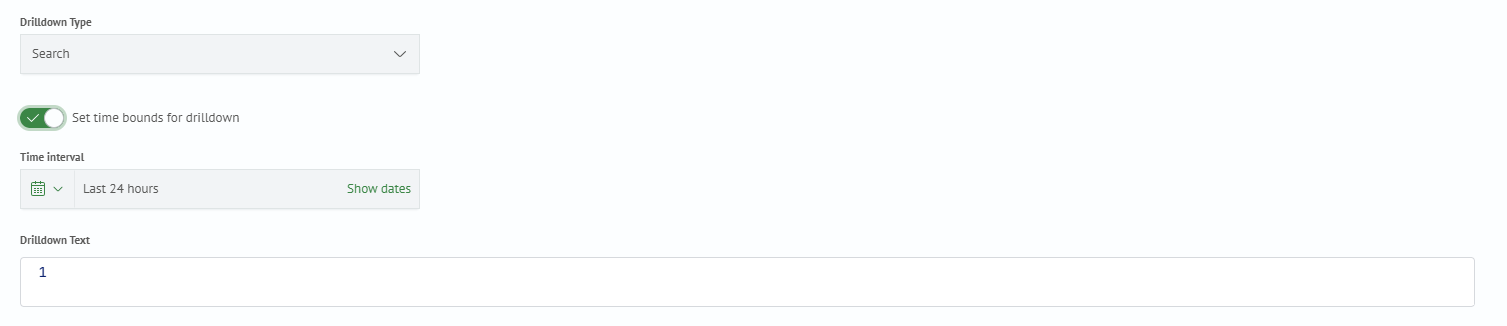
Executes a predefined search query.

Comparison Fields
In the Comparison Fields section, you can set comparison parameters for grouping:

Field Name- the final name of the field to be displayed in the aggregationSearch Task- the search job that generates the incidentValue- the name of the field from the incident to be compared. If in the fieldSearch jobsif more than one task is selected, then the name of the field from the incident must be specified for each task. If you need to compare by the field that was included in the incident from the search results in the search job, then add the prefix fields:fieldsbefore thefield.<Field name>. There is no need to add a prefix for the fields from the incident card
Functional Fields
In the Functional Fields section, you can configure calculations in the group.

Field Name- the final name of the field to be displayed in the aggregationFunction- the function that will be applied to the field from the incident The following functions are currently supported:MAX,MIN,SUM,VALUES,AVG,EARLIEST,LATEST
Search Task- the search job that generates the incidentValue- the name of the field from the incident to be compared. If in the fieldSearch jobsif more than one task is selected, then the name of the field from the incident must be specified for each task. If you need to compare by the field that was included in the incident from the search results in the search job, then add the prefix fields:fieldsbefore thefield.<Field name>. There is no need to add a prefix for the fields from the incident card
Using fields from this section is convenient, for example, when you need to specify in the group card which hosts were mentioned in all incidents of the group.
Additional Fields
In the Additional Fields section, you can set additional incident parameters that are changed in the module settings.

Editing Grouping Rules
To edit a grouping rule:
- In the
Grouping Rulestable, in theActionscolumn, click the...button - Select the
Editaction - Make changes in the
Rule Editor - Click the
Savebutton at the top or bottom of the interface

Enabling and Disabling Grouping Rules
To enable and disable grouping rules:
- In the
Grouping Rulestable, in theActionscolumn, click the...button - Select the
DisableorEnableaction
Deleting Grouping Rules
To delete a grouping rule:
- In the
Grouping Rulestable, in theActionscolumn, click the...button - Select the
Deleteaction
Bulk Operations on Groups
Editing and Deleting Groups
When configuring incident groups, the functionality for bulk editing and deleting groups is also implemented. To do this, you need to:
- In the
Incident Groupstable, select the required groups by clicking on the empty squares to the left of the group name - Choose the action
Edit selectedorDelete aggregations - If editing is being performed, select the configuration type:
PermissionsorTags
As a result, the selected action will be applied to all chosen groups.
Exporting Incident Groups
To work with selected incident groups, a data export function is available. To do this:
- Select groups in the
Incident Groupstable. To do this, check the boxes in the corresponding rows (in the column to the left of the group name) - Click the
Exportbutton, which will appear on the top toolbar after selecting one or more groups - In the dialog box that opens, confirm the action by clicking
Export
Export is only available when items are selected. Data is exported to a file in .json format.