Lookup Manager
A lookup (lookup) is a static data table used to enrich or transform data during a search.
The Lookup Manager module is responsible for creating, viewing, editing, and deleting lookups, as well as managing the values contained within them. It provides centralized management of reference data used in the system.
Lookup List
To view the existing lookups, go to Main Menu - Lookups. The page displays a list of lookups:

The table contains the following columns:
Lookup Name— the lookup name and tags. Clicking it opens the lookup editorSource Type— the index name and the list of lookup fieldsType—SystemorUser
Above the table, there is a search bar, a tag filter, and a lookup type filter. The Create button opens the lookup creation wizard.
The actions menu at the end of each row contains the following options:
Tags— manage lookup tagsEdit Config— open the lookup for editingPermissions— configure access permissionsOpen in Search— open the lookup data on theSearchpage in a new tabDelete— delete the lookup; this option is unavailable for system lookups
When multiple lookups are selected using the checkboxes, bulk actions become available: changing tags and permissions (Edit Selected) and bulk deletion.
If a correlator is configured in the system, the Lookup List and Active Lists tabs are displayed on the page. Working with active lists will be described in a separate section.
Lookup Creation
It is recommended that lookup indexes have names corresponding to their lookup names.
A lookup is created using a wizard with three steps that must be completed in sequence. To create a lookup:
-
Go to
Lookup Listand clickCreate. The lookup creation wizard opens -
In the
Lookup Namestep, enter the configuration name. The name may contain only Latin letters, digits, hyphens, and underscores, without spaces or separators -
In the
Source Indexstep, enter a new index name or select an existing index from the list
The selected index type is displayed below the field:
Existing IndexorNew Index. -
In the
Fieldsstep, define the list of lookup fields. The contents of this step depend on the index selected in the previous step-
for a new index, add fields using the
Add Fieldbutton and specify the name and type of each field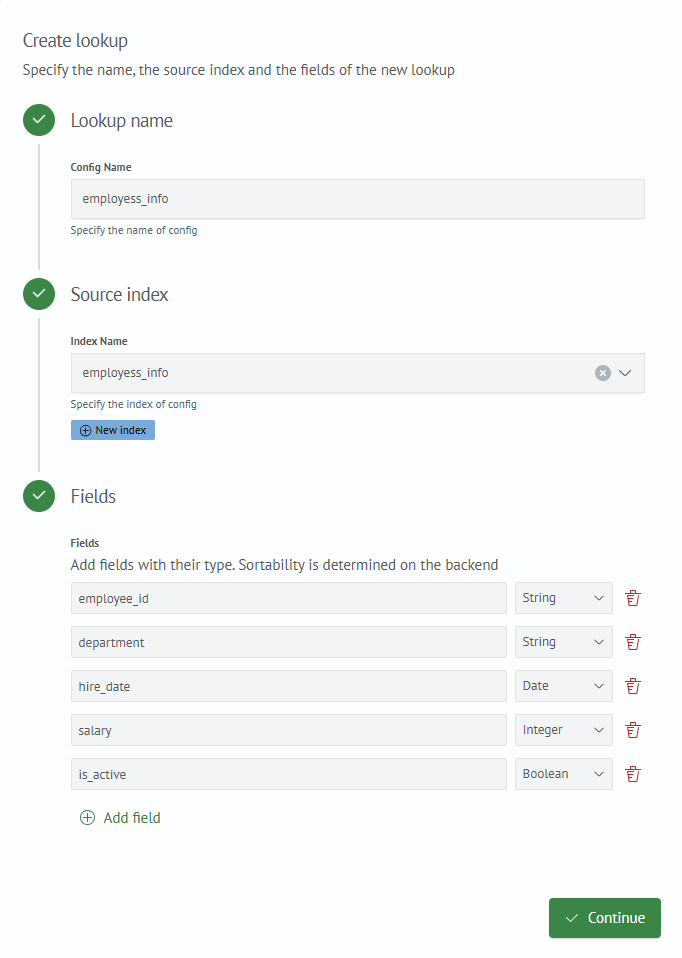
The following field types are available:
String,Integer,Decimal,Date,Boolean, andIP Address. For more information, see Data Types. -
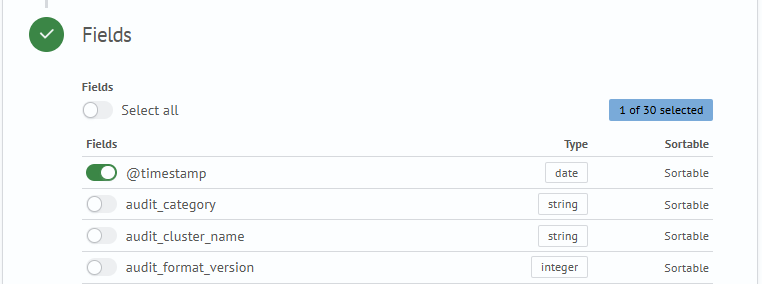
for an existing index, select fields from the index schema using the toggles. The field type and whether the field supports sorting are displayed for each field
-
-
Click
Continue. The next action depends on the index type-
if an existing index is selected, the lookup is created immediately, and the editor opens with the index data
-
if a new index is created, an empty editor table opens. The index and lookup configuration are created after you click
Save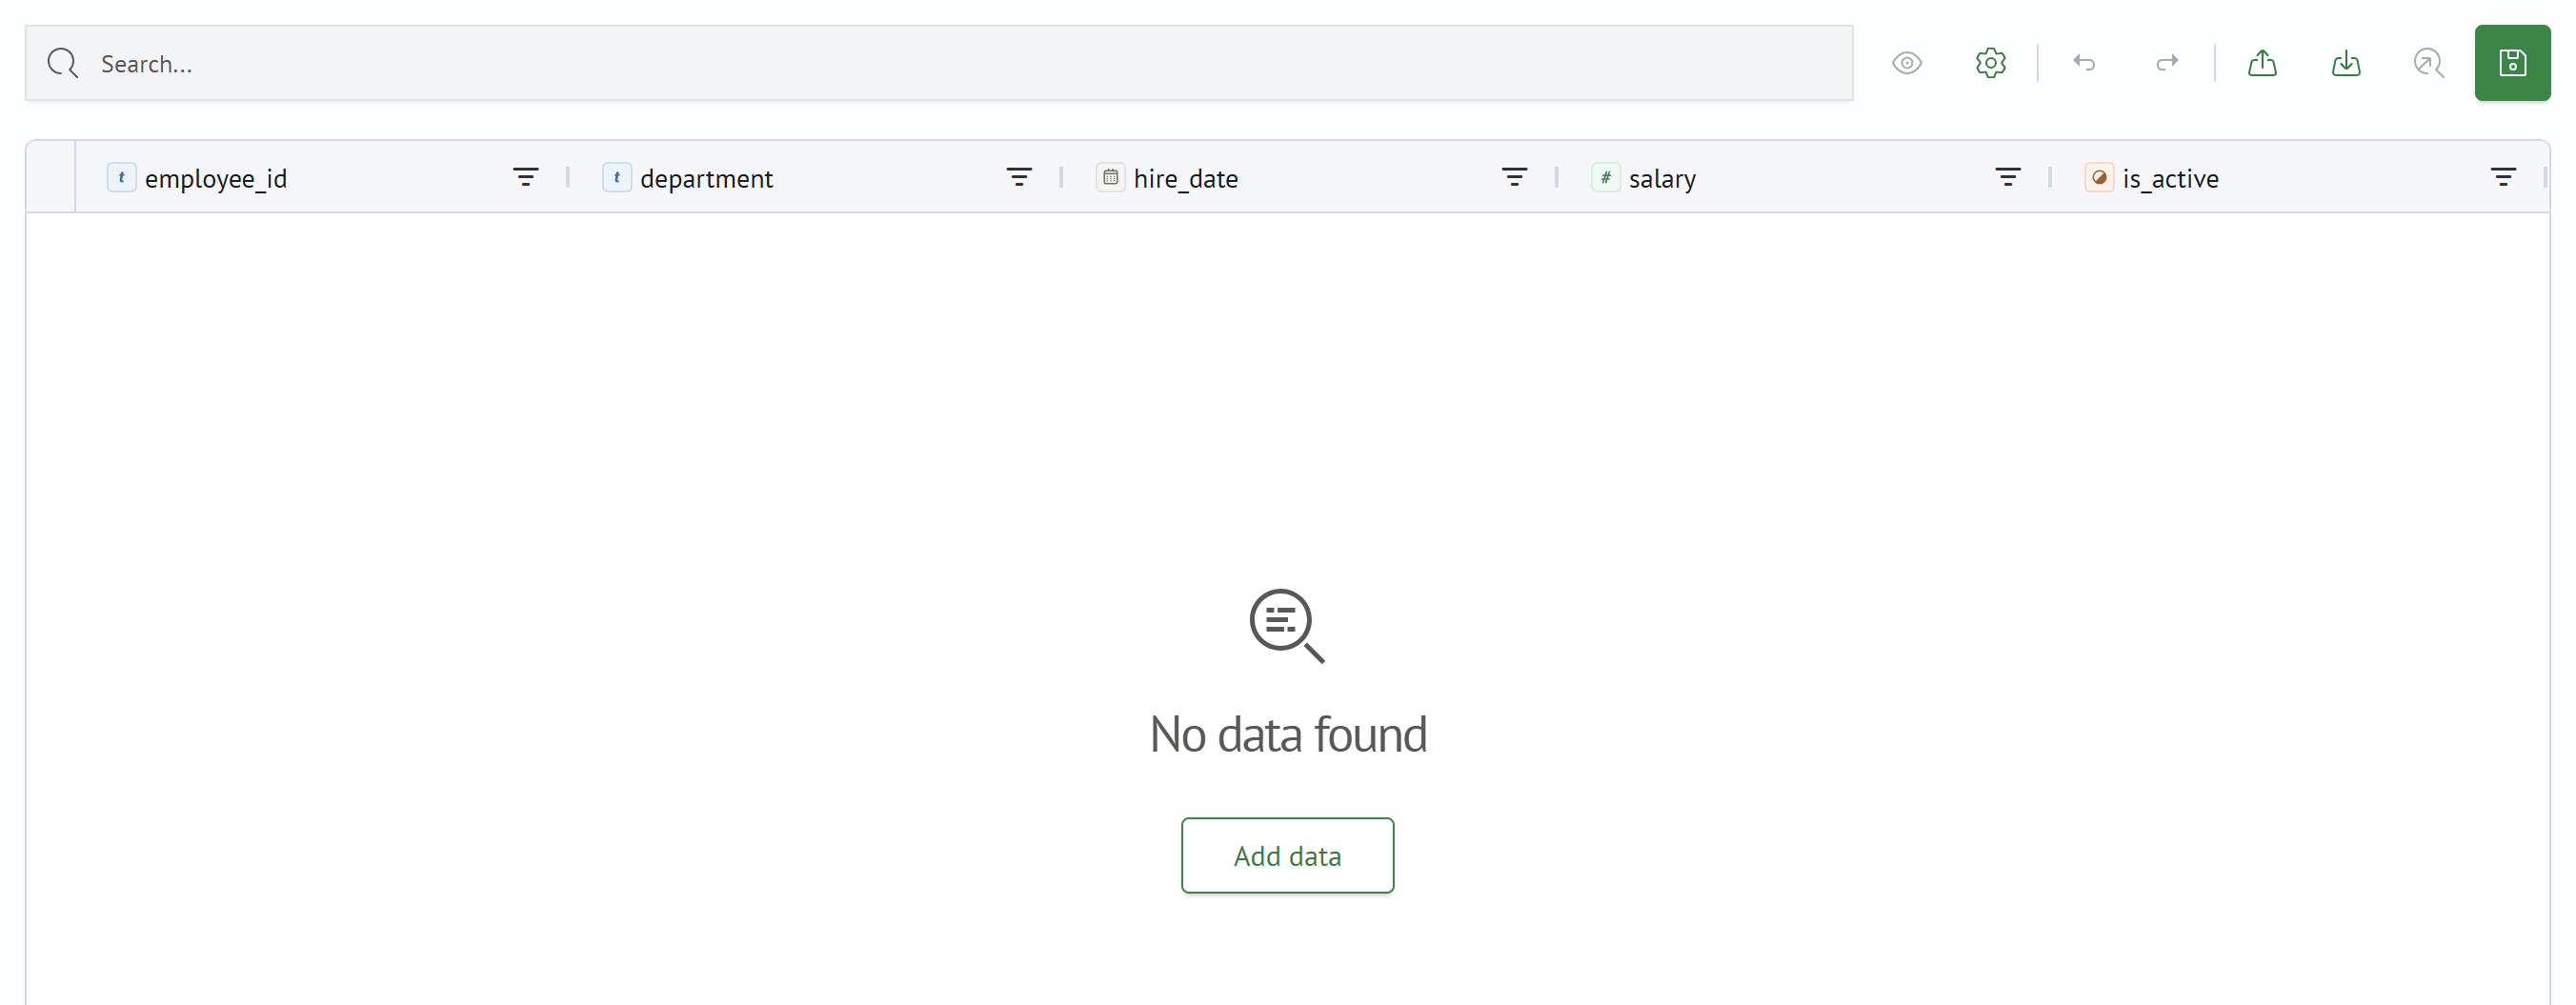
-
After it is created, the lookup appears in the general list.
Lookup Editor
The editor opens when you click a lookup name in the list. It is used to view and modify lookup data and settings:
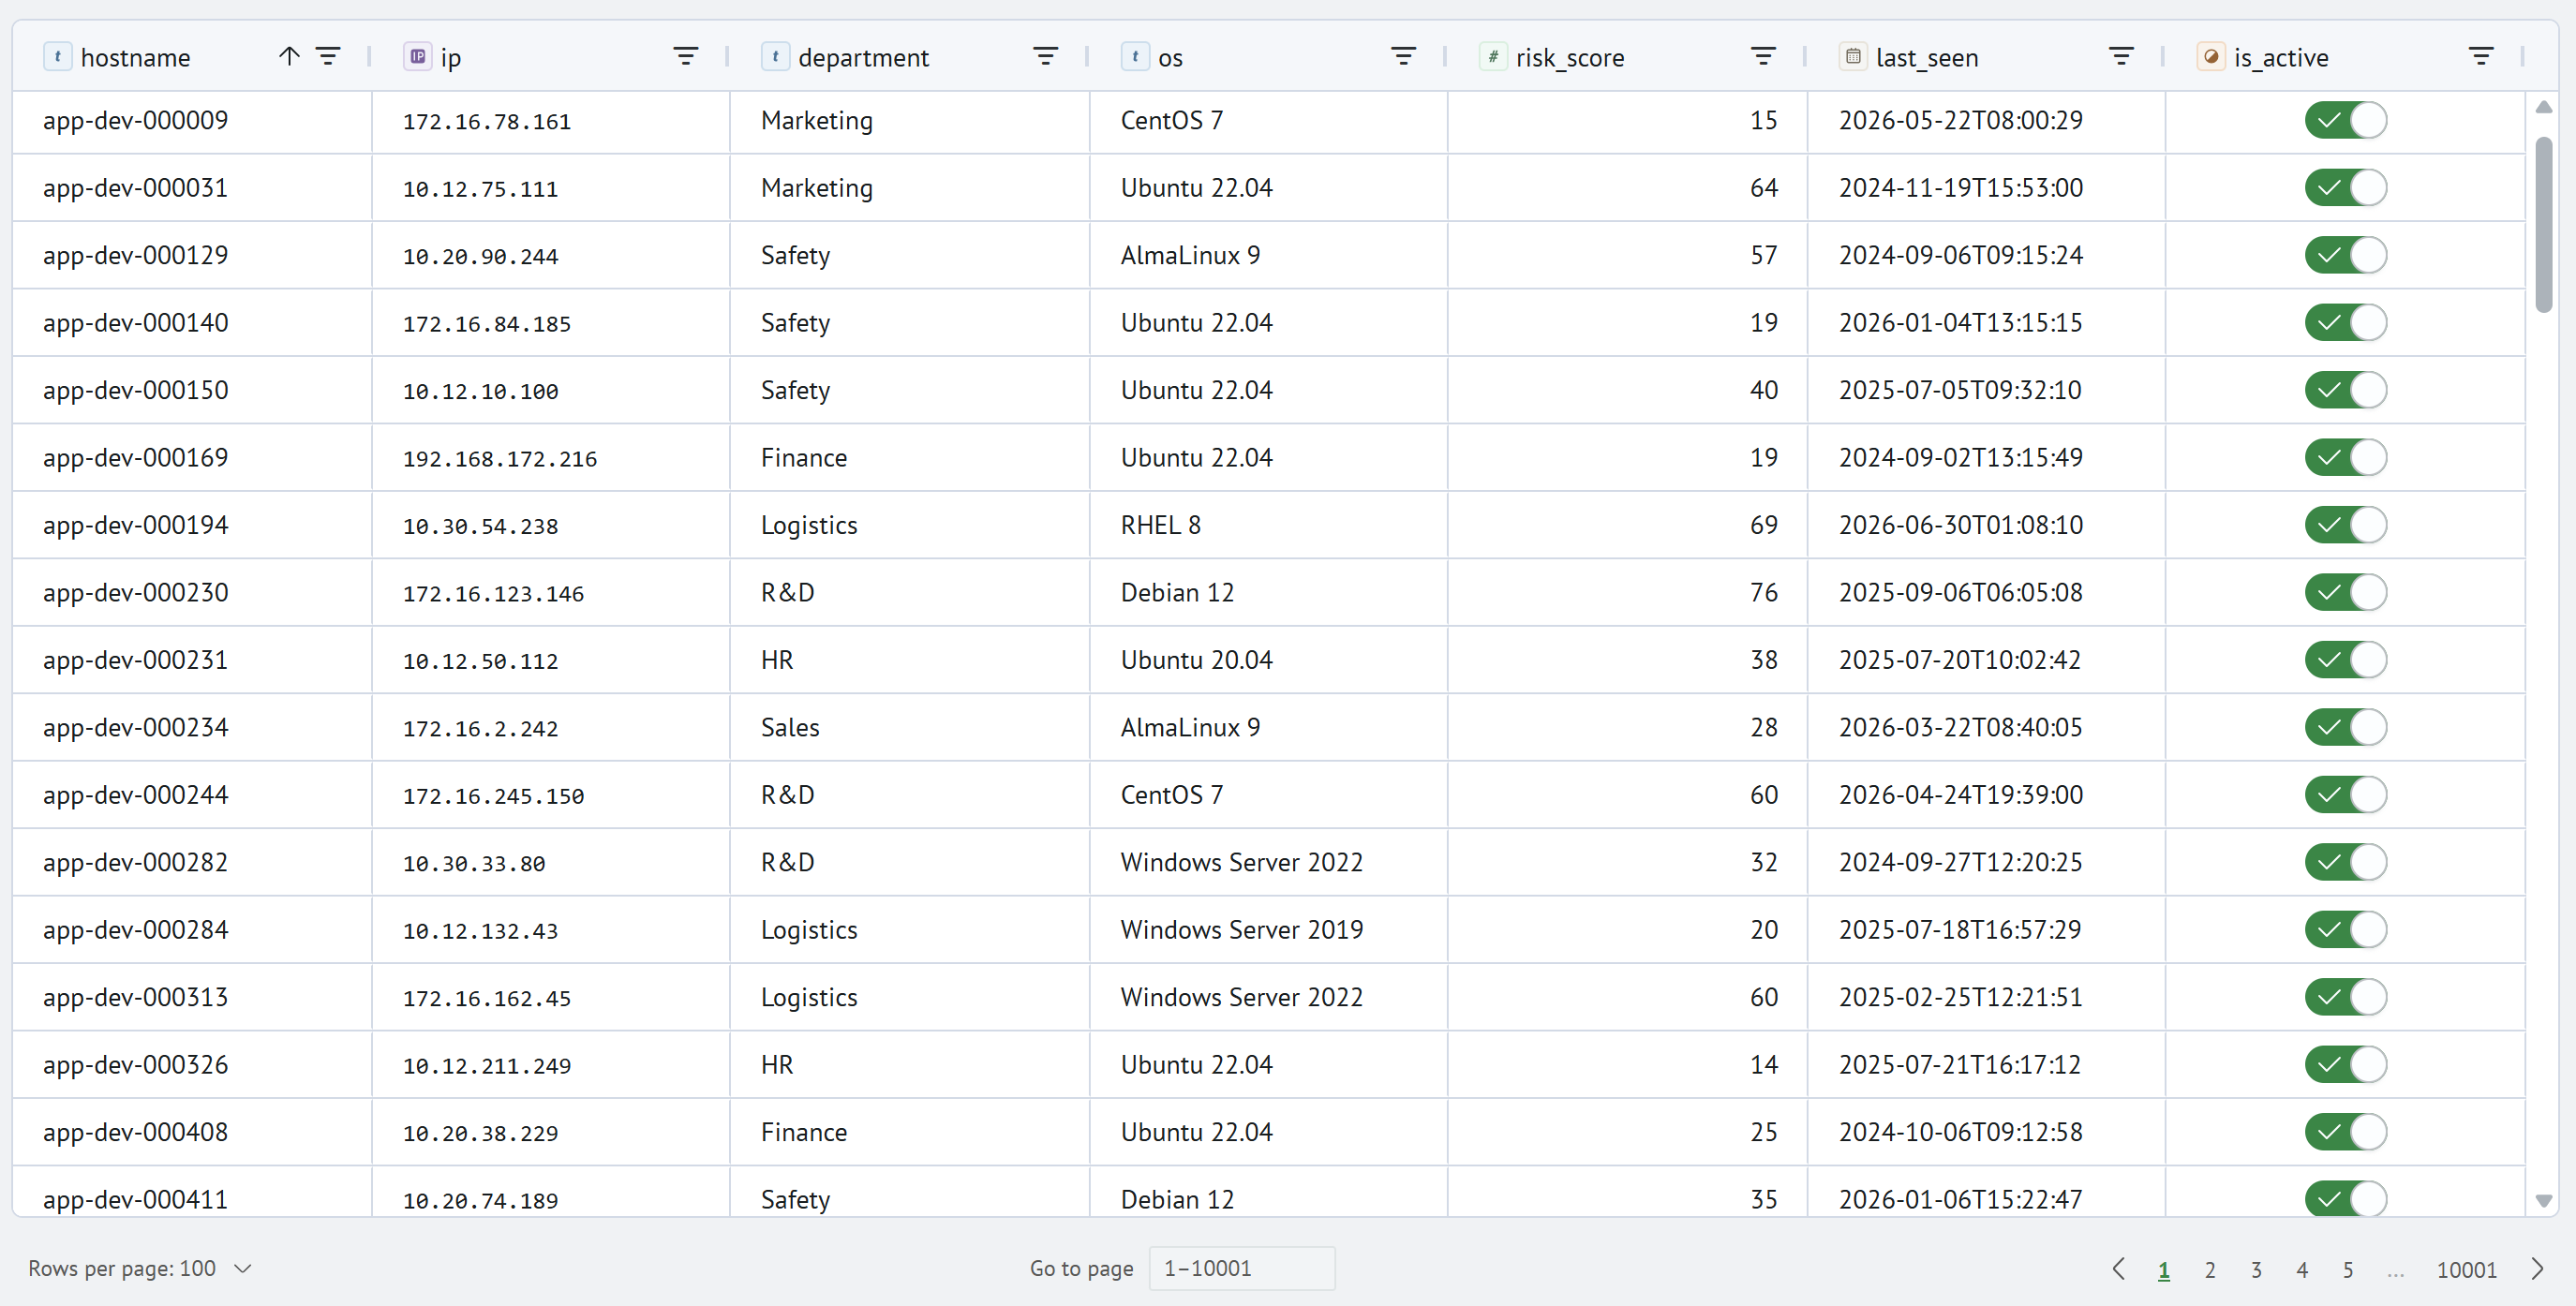
Data is loaded from the server page by page, so the editor works the same way with lookups of any size.
Toolbar
The top section of the editor contains a search bar and the following buttons:
Hidden Columns— manage hidden columns; the button is active only when there are hidden columnsLookup Settings— open the lookup settingsUndo Last Action/Redo Last Action— undo and redo changesExport— export data to a CSV fileImport— import data from a CSV fileOpen in Search— open the lookup data on theSearchpage in a new tabSave— save all accumulated data and configuration changes
Data Types
Each lookup column has a data type. The type icon is displayed in the column header next to its name. The type determines the value input method and the available filtering operations:
| Type | Display | Input Method |
|---|---|---|
String | text | text field |
Integer | number with digit grouping | numeric field |
Decimal | number with digit grouping | numeric field |
Date | textual date representation | text field; the value is saved without conversion |
Boolean | toggle | toggle directly in the cell, without entering edit mode |
IP Address | monospaced text | pop-up editor with an IPv4 / IPv6 version selector |
Cell editing starts by double-clicking the cell or pressing Enter while the cell is selected. For IPv4, the IP address editor consists of four segments with automatic navigation between them:

In addition to the types listed above, String cells can store arrays of strings and arrays of objects. Array elements are displayed as separate badges in the cell and can be edited in the array editor.
Array Editor
The array editor opens when you double-click a cell containing an array or select Edit as Array from the cell context menu. The editor contains two tabs: List and JSON.
For an array of primitive values, the List tab displays a list of fields and allows you to drag elements to change their order:

For an array of objects, the List tab displays a table where you can edit values, rename and delete columns, and add rows and columns:
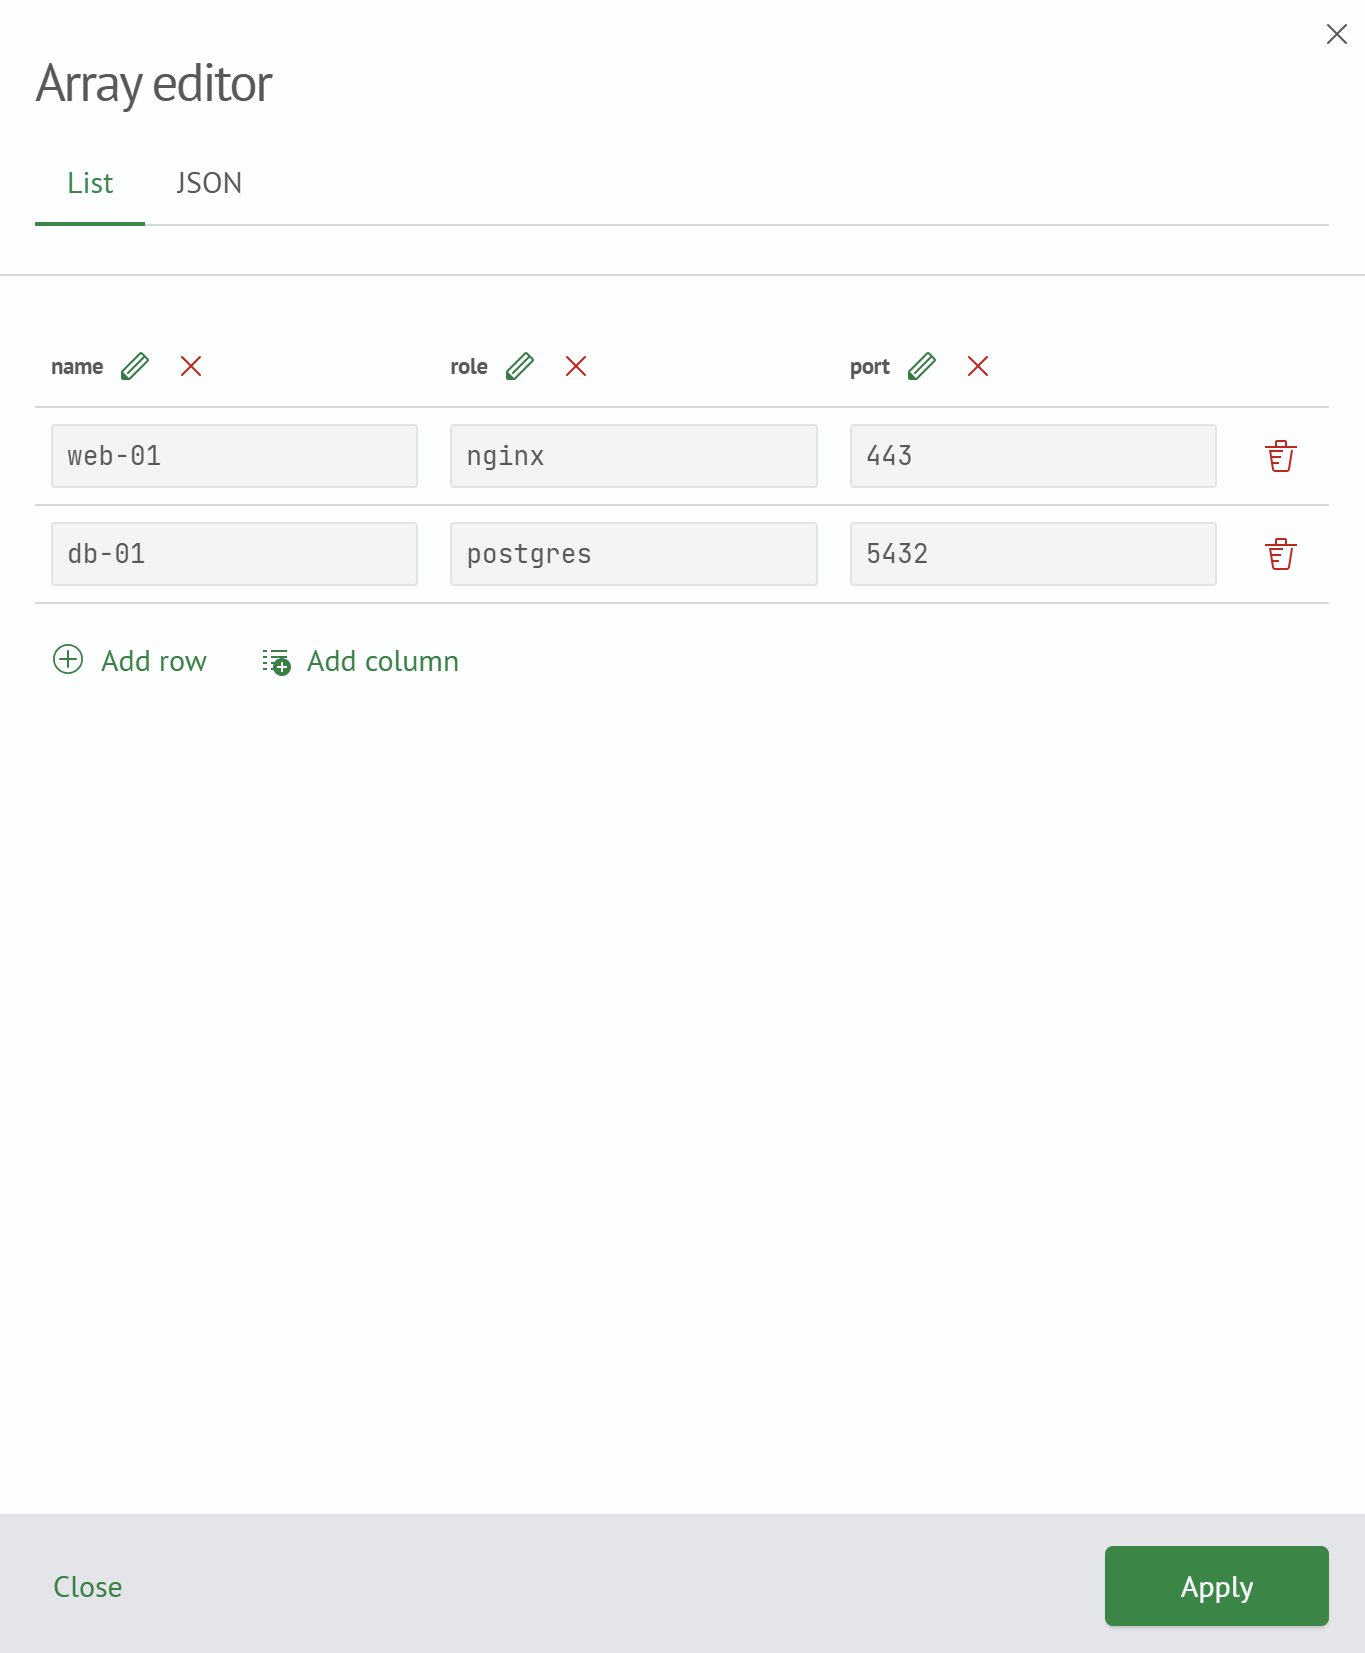
The JSON tab allows you to edit the array as text with syntax highlighting and JSON validation:

For an empty array, the List tab prompts you to select how the array should be populated: Value List or Object Table.
The Apply button transfers the changes to the cell. The button is unavailable if the JSON tab contains invalid JSON.
Lookup Settings
The settings are opened using the Lookup Settings button on the editor toolbar:
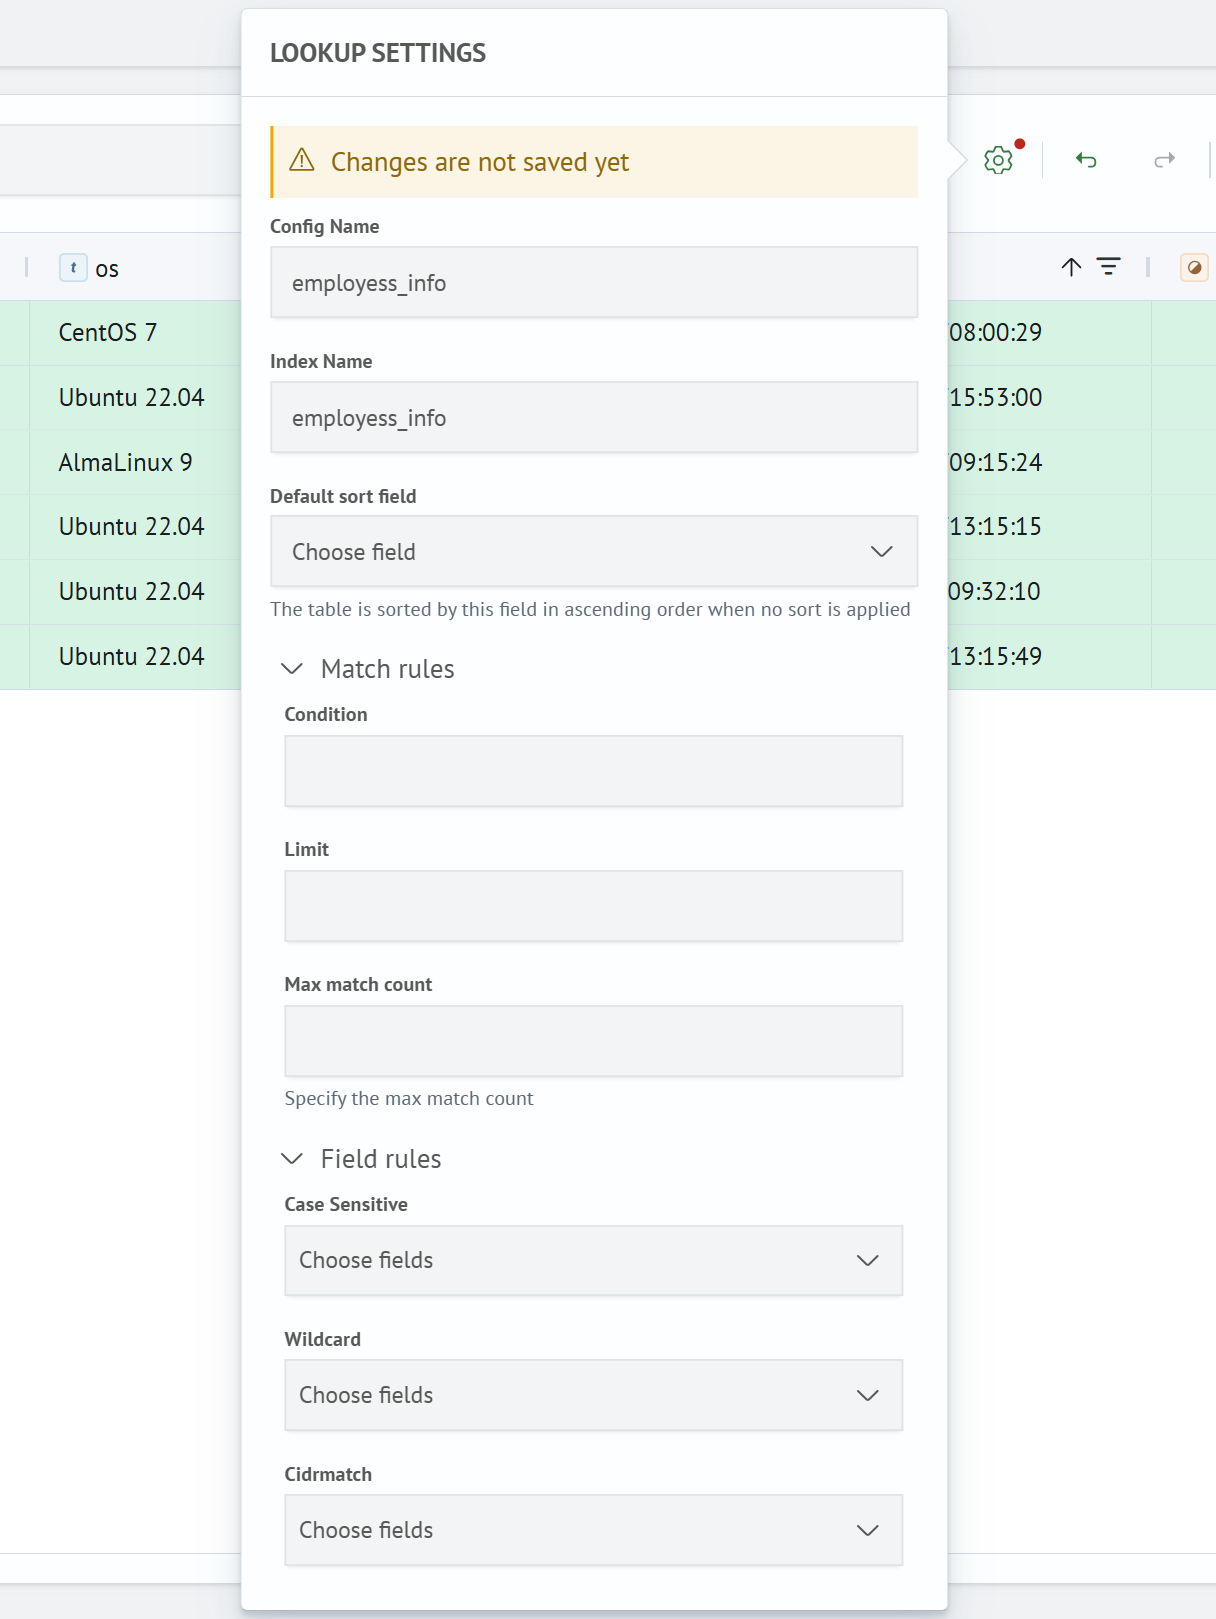
The following parameters are available:
Config NameandIndex Name— cannot be changed after the lookup is created; the values can be copied to the clipboardDefault Sort Field— the field by which the table is sorted when no sorting is specifiedMatch Rulessection — theCondition,Limit, andMax Match countparametersField Rulessection — theCase Sensitivity,Wildcard, andCidrmatchfield lists
The parameters are described in Configuration Structure.
Settings changes are applied only after you click Save on the toolbar. If there are unsaved configuration changes, a red indicator appears on the settings button, and the Changes are not saved yet warning is displayed in the settings.
Working with Rows
The main row operations are available through the context menu, which opens when you right-click a cell:
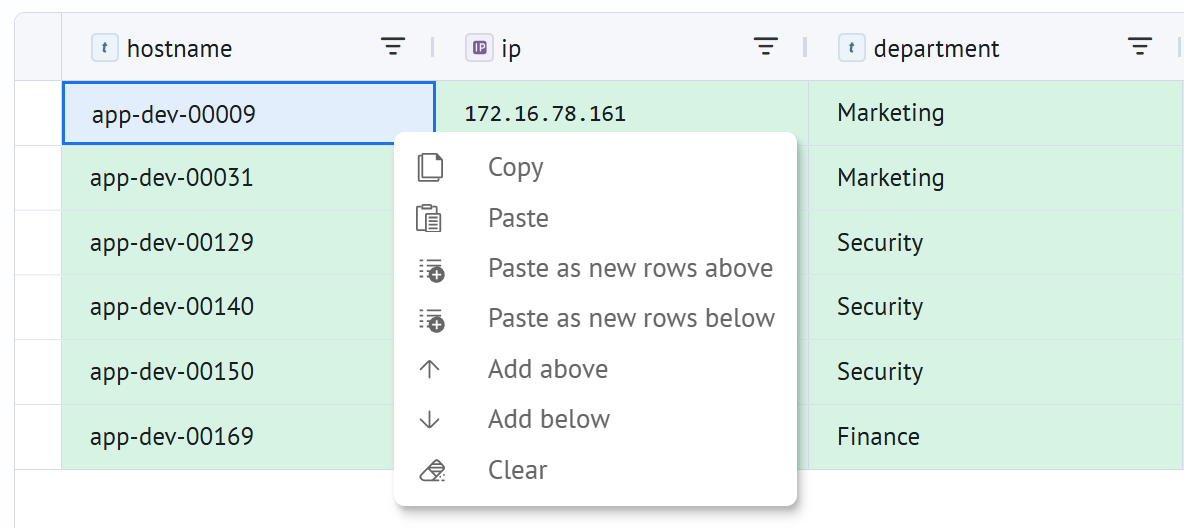
The following options are available:
Copy— copies the selected cells to the clipboardPaste— pastes the clipboard contents into the selected areaPaste as new rows above/Paste as new rows below— pastes the clipboard contents as new rows without overwriting existing dataAdd Above/Add Below— adds a new empty rowClear— clears the values of the selected cellsEdit as Array— opens the array editor
Options that are unavailable in the current context are hidden. For example, paste options are not displayed when the clipboard is empty.
When you right-click the row number column, the menu includes the Delete option, which deletes the selected rows.
If the lookup is empty, you can add the first row by clicking Add New Row in the center of the table.
Working with Columns
Column operations are available through the context menu, which opens when you right-click a column header:
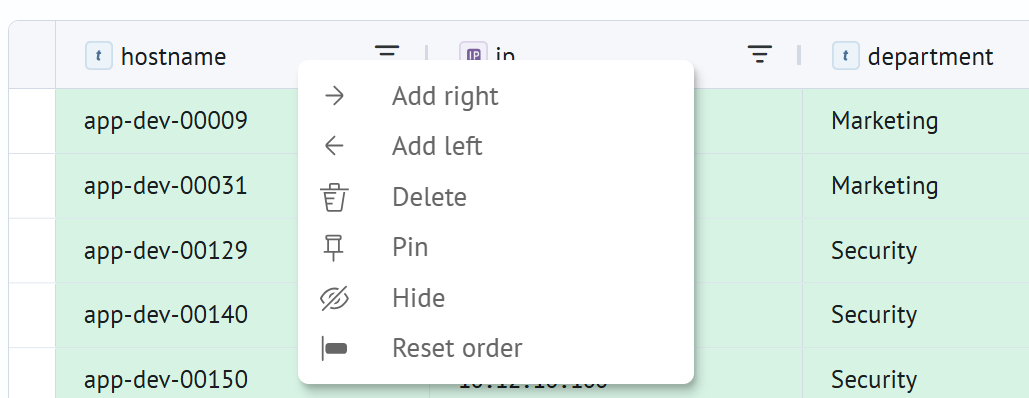
The following options are available:
-
Add Right/Add Left— adds a new column. In the modal window that opens, specify the field name and type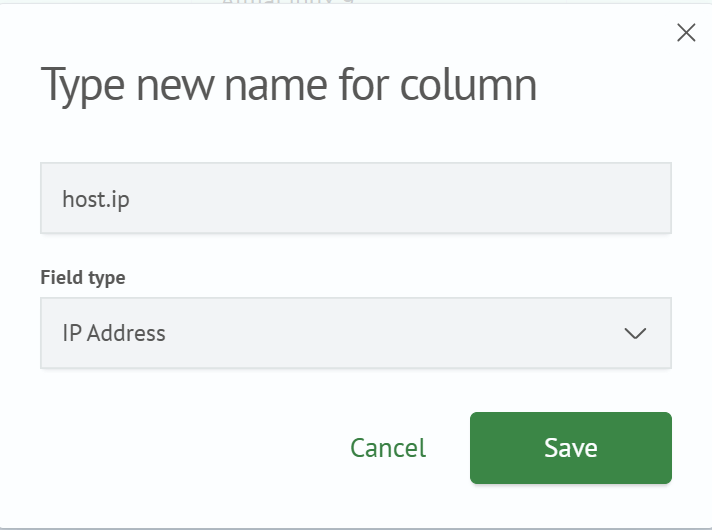
-
Delete— deletes the column. The field is removed only from the lookup configuration, while the data remains physically stored in the index. If a column with the same name and type is created again, the values will reappear in the table -
Configure— configures a new, unsaved column by renaming it or changing its type -
Pin/Unpin— pins or unpins the column at the left edge of the table -
Hide— hides the column -
Reset Order— restores the original column order
You can resize a column by dragging the edge of its header and reorder columns by dragging the headers themselves. Column width, order, and visibility are saved in the user’s browser.
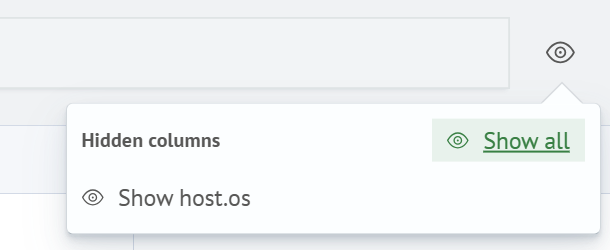
Hidden columns are displayed in the list opened using the Hidden Columns button on the toolbar. You can show columns individually or display all of them by clicking Show All:
Selection and Clipboard
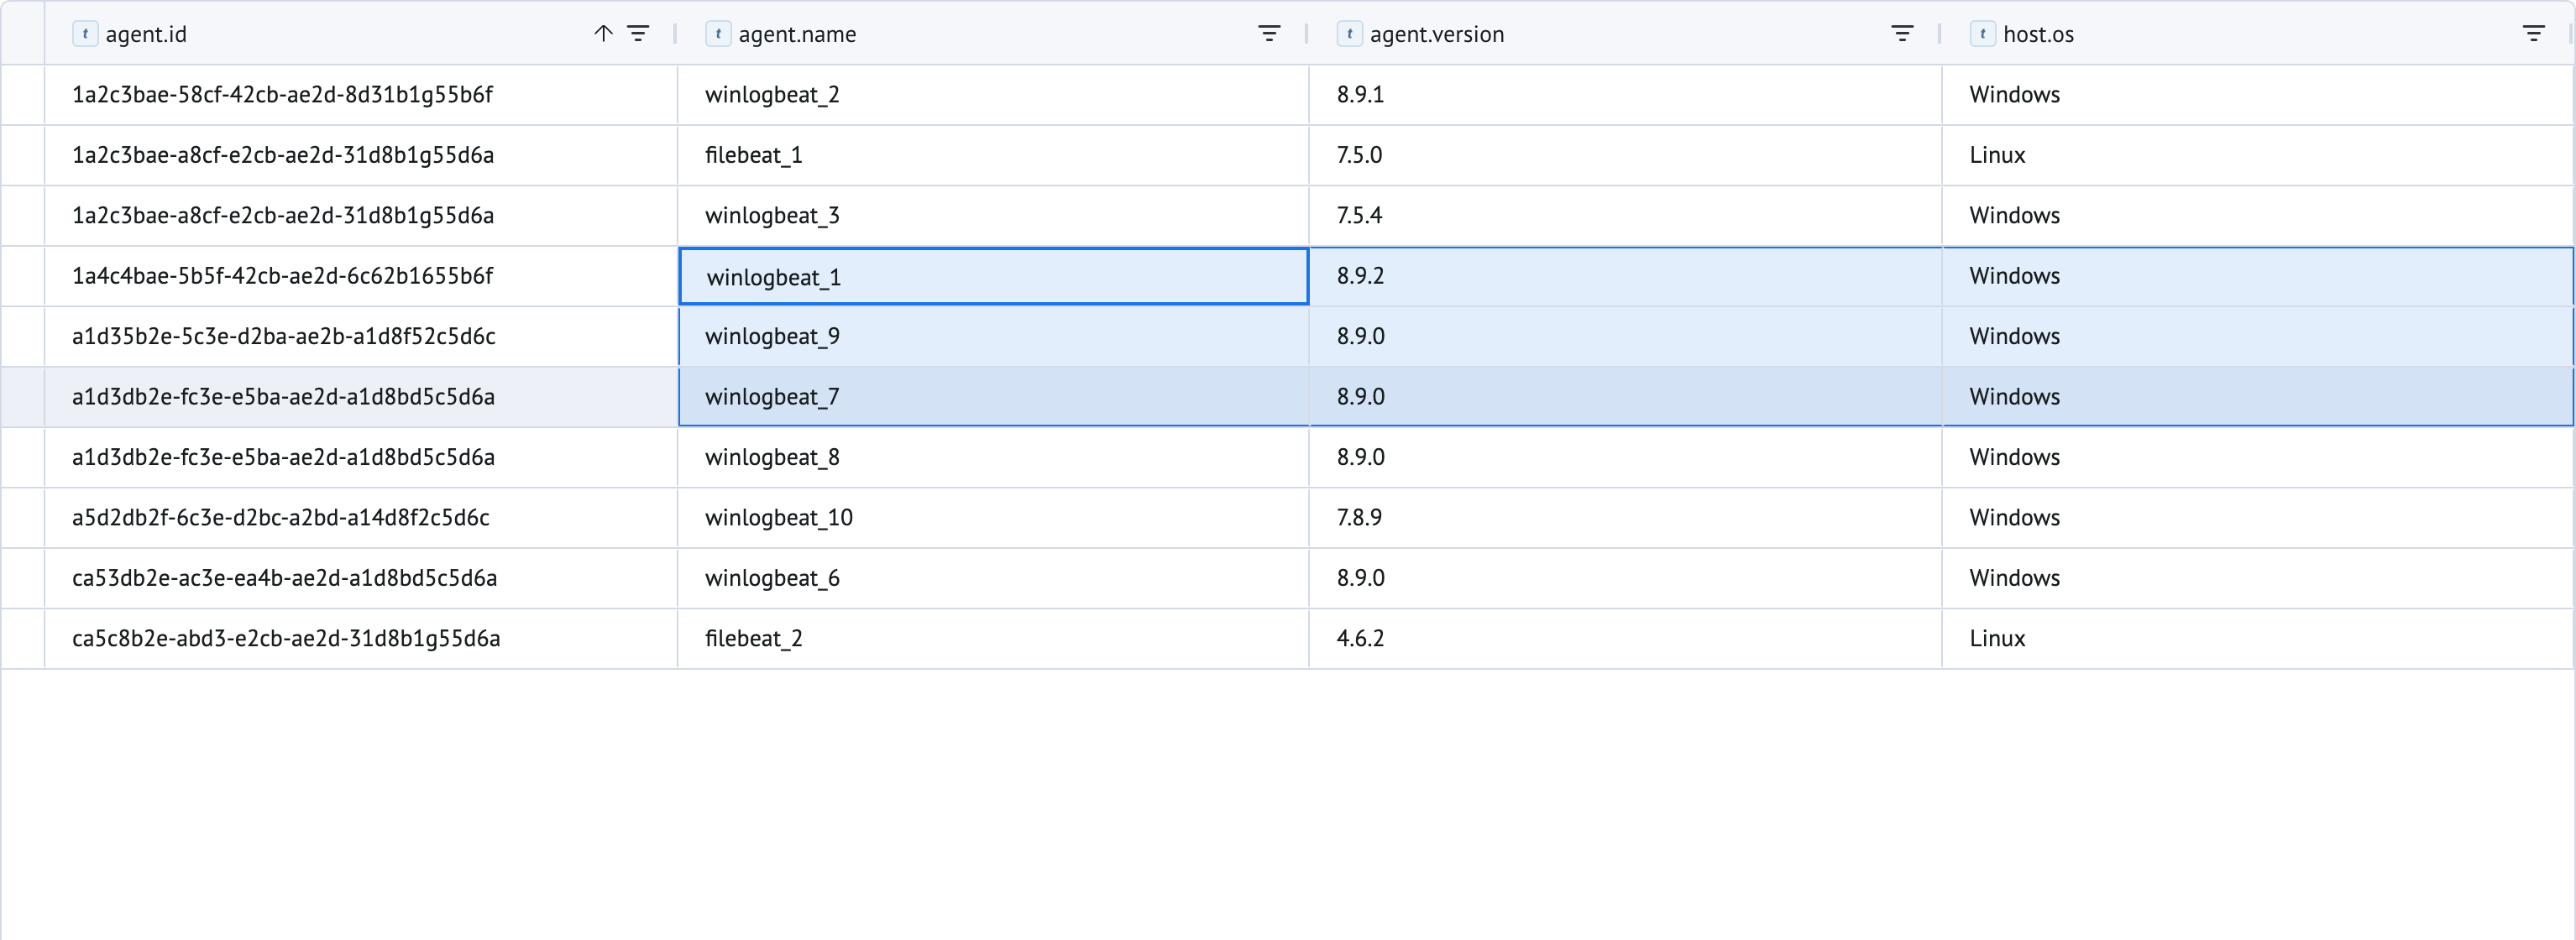
The table supports selecting individual cells and ranges:
- select a range by dragging the pointer while holding the left mouse button
Shift + click— selects a range from the currently selected cellCtrl/Cmd + click— adds or removes individual cells from the selection- click the row number column — selects the entire row
Data is copied in TSV format, allowing it to be transferred between the lookup and spreadsheet applications such as Excel. Clipboard pasting works in two modes:
- paste from an anchor cell — used when the selected area is smaller than the clipboard contents. Data is placed to the right and downward from the top-left selected cell. If there are not enough rows, the table is automatically extended with new rows
- range paste — used when the selected area is equal to or larger than the clipboard contents. Values are inserted within the selected area, starting from its top-left cell
After pasting, the affected area is selected automatically. To paste data as new rows without overwriting existing data, use Paste Above / Paste Below from the context menu.
Keyboard Shortcuts
| Operation | Keyboard Shortcut | Description | |
|---|---|---|---|
| Windows | Mac | ||
| Select All | Ctrl + A | Cmd + A | Selects all headers and data cells |
| Copy | Ctrl + C | Cmd + C | Copies the selected cells in TSV format |
| Paste | Ctrl + V | Cmd + V | Pastes the clipboard contents into the current range |
| Clear | Delete / Backspace | Deletes the contents of the selected cells | |
| Undo | Ctrl + Z | Cmd + Z | Undoes the last change |
| Clear Selection | Esc | Clears the cell selection | |
Highlighting Changes
All changes are accumulated in a draft and applied only after you click Save. Until they are saved, modified data is highlighted in the table:
- green — new rows
- yellow — modified cells
- red — cells containing values that do not match the column type. Hover over a cell to view the error message
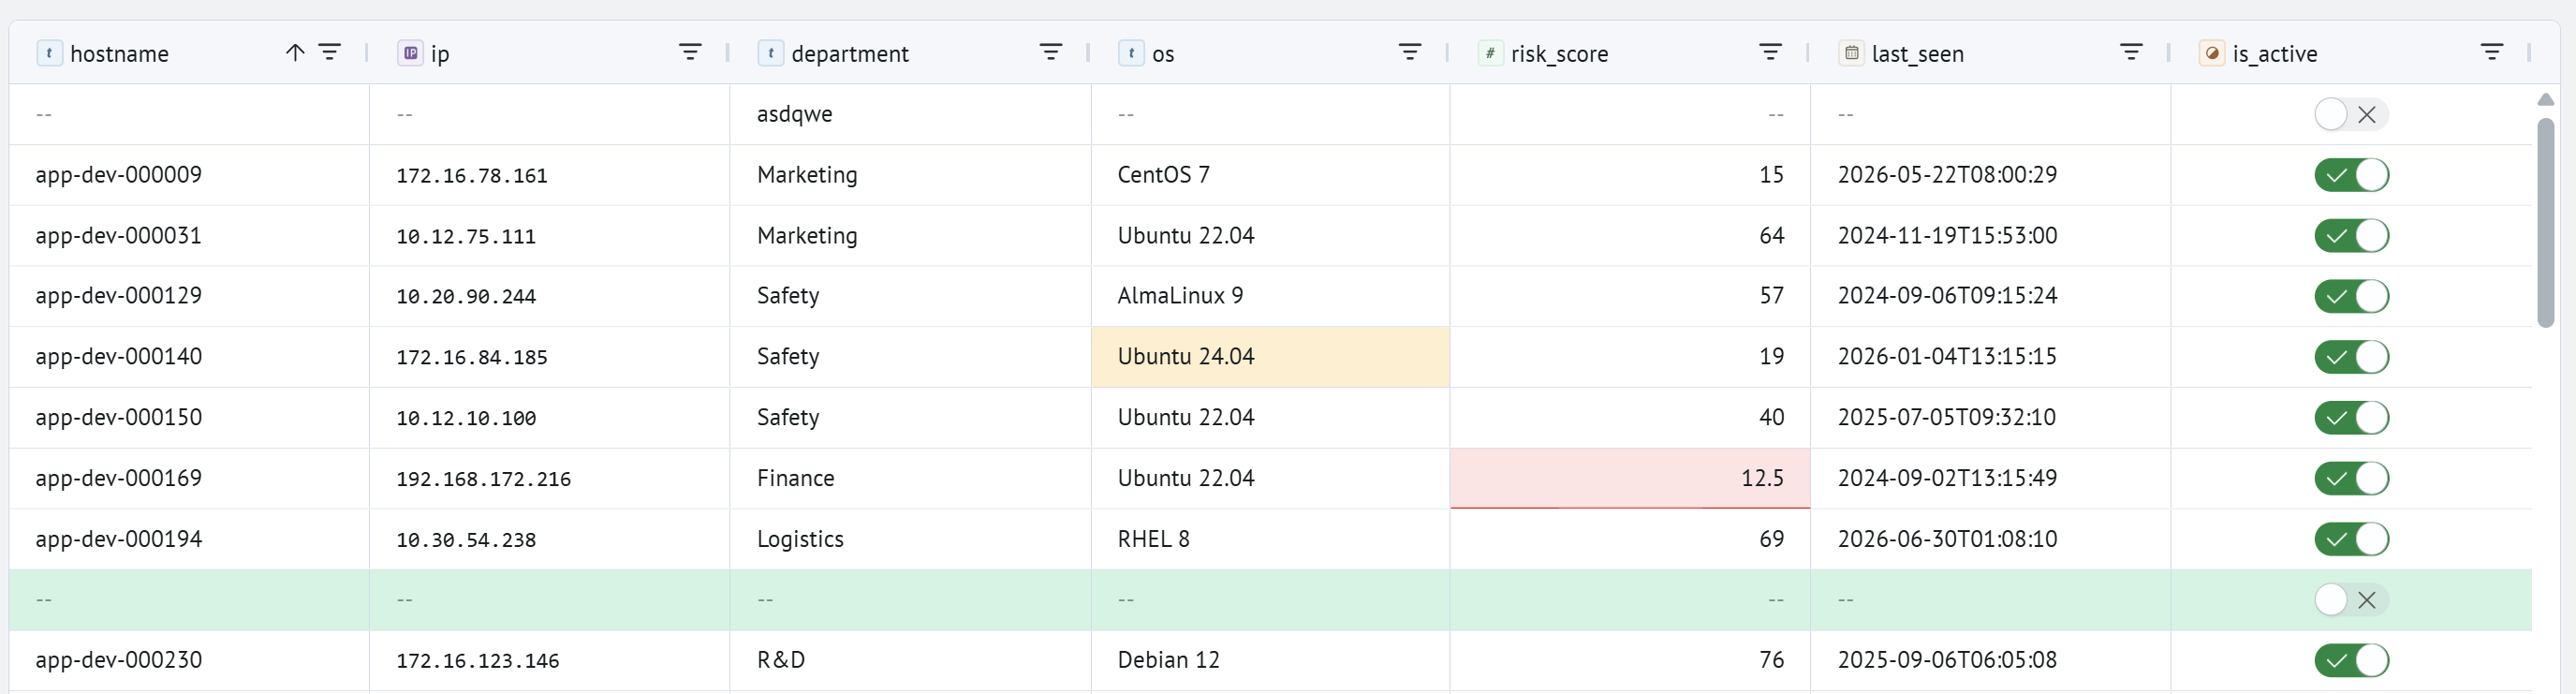
The Save button remains unavailable while the table contains invalid values.
Undoing and Redoing Actions
The Undo Last Action and Redo Last Action buttons on the toolbar apply to all unsaved changes, including cell edits, adding and deleting rows and columns, pasting from the clipboard, and settings changes.
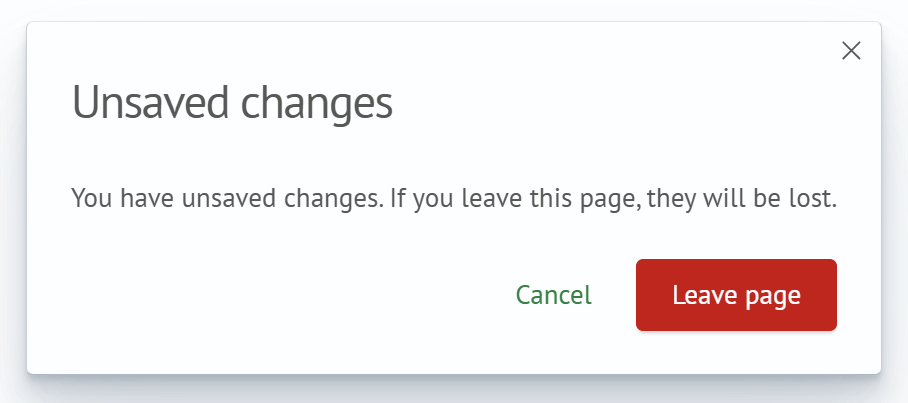
If you attempt to leave the page with unsaved changes, a warning is displayed:
Sorting and Filtering
Sorting is enabled by clicking a column header and cycles through the following states: ascending, descending, and no sorting. The table can be sorted by only one column at a time. If no sorting is specified, the Default Sort Field from the lookup settings is used.
The column filter opens when you click the funnel icon in the column header:
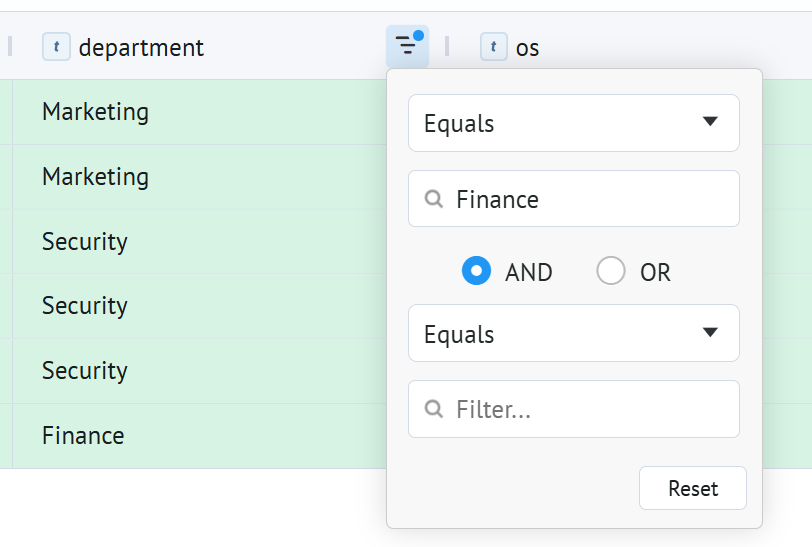
The available filter operations depend on the column data type:
- text fields:
Equals,Does Not Equal,Begins With,Contains,Does Not Contain,Ends With,Blank,Not blank - numeric fields:
Equals,Does Not Equal,Greater Than,Greater Than or Equal To,Less Than,Less Than or Equal To,Between,Blank,Not blank - IP address fields:
Equals,Does Not Equal,Blank,Not Blank. You can specify an exact IP address or a subnet in CIDR notation, for example,192.168.0.1/24
A single filter can contain up to 10 conditions combined using the logical operators AND / OR. The Reset button clears the filter for the current column.
Sorting, filtering, and search are performed on the server across all lookup data, not only the currently loaded page.
Page Navigation
The navigation panel is located at the bottom of the editor:

The Rows per Page button allows you to select the number of rows displayed per page: 50, 100, 250, 500, or 1,000. The Go to Page field allows you to navigate to any page by entering its number.
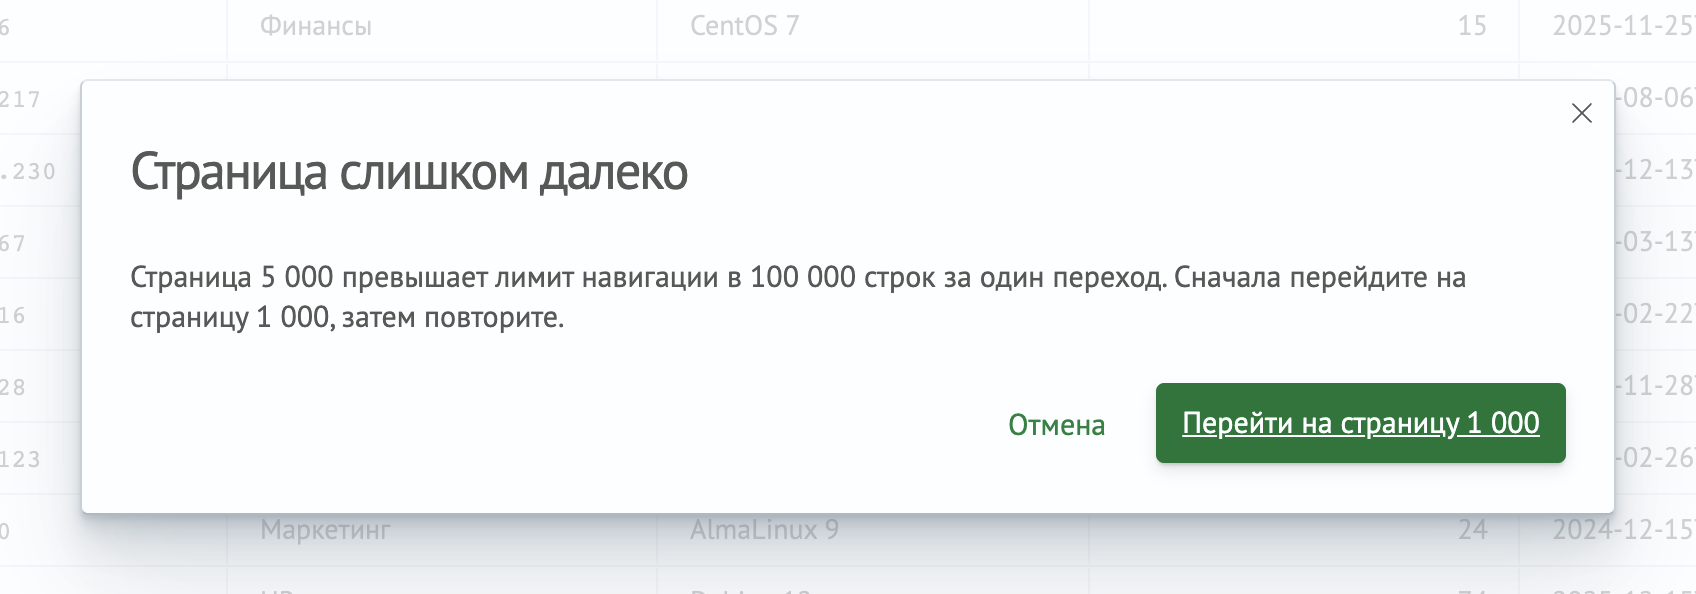
The data store limits navigation depth: a single request can skip no more than 100,000 rows from the beginning, the end, or the current position. If you attempt to navigate to a page beyond this limit, a warning is displayed suggesting that you complete the navigation in several steps:
Search
Search supports wildcard pattern matching. The match conditions specified in the lookup settings do not affect the search results. Enter a query in the toolbar search bar and press Enter to apply it. All the examples below use the following lookup:

Simple Condition
You can search in the lookup using a simple condition by:
- A specific field, as shown in the example

- A value that can be in any field, as shown in the example

Compound Condition
You can search in the lookup using a compound condition by:
- Specific fields, as shown in the example

- Values that can be in any field, as shown in the example

Adding Data
You can add data in several ways:
-
Create and populate rows manually. For details, see Working with Rows
-
Add existing data to the lookup using the outputlookup command
Please noteThis method may overwrite fields, causing the previous data to be deleted. This behavior occurs when the
appendparameter of theoutputlookupcommand is set tofalse. Otherwise, the new data is added to the existing lookup data. -
Import a CSV file into the lookup. To import data, click
Importon the editor toolbar. A modal window opens
In this window, click
Select a .csv file, choose a CSV file, and then clickImport. New records are added to the existing data. The delimiter is detected automatically based on the file header row.Import features:
- the file size is not limited: data is read and sent to the server in chunks, and upload progress is displayed
- the
Merge columns from the .csv filetoggle adds columns from the file header that are not yet included in the lookup configuration - an interrupted upload can be resumed: when you select the same file again, you are prompted to continue from where the upload stopped (
Continue) or restart it (Start Over)
-
Add new data to the lookup index through the
Dev Tools console. Changes are saved automatically after new records are added
Exporting Data
The Export button on the toolbar downloads the lookup data, including unsaved changes, to a <lookup_name>.csv file.
Configuration Structure
| Name | Index Field | Syntax | Description | Example Data |
|---|---|---|---|---|
| Configuration Name | name | <string> | Lookup name. Cannot be changed after creation | lookup_name |
| Index Name | idx | <string> | Name of the index associated with the lookup. Cannot be changed after creation | index_name |
| Fields | fields | <array> | List of lookup fields used for enrichment. Managed through the table columns in the editor | field1, field2 |
| Default Sort Field | default_sort_field | <string> | Field by which the table is sorted in ascending order when no sorting is specified | field1 |
| Case Sensitivity | case_sensitive | <array> | List of lookup fields that are case-sensitive during matching | field1, field2 |
| Wildcard | wildcards | <array> | List of lookup fields used as wildcards for matching | field1, field2 |
| Cidrmatch | cidrmatch | <array> | List of lookup fields matched using the Cidrmatch rule | field1, field2 |
| Condition | condition | <string> | Filtering condition applied before lookup records are matched | status != "Dismissed" |
| Limit | limit | <int> | Limits the size of the lookup data before matching | 1000 |
| Maximum Number of Matches | max_match | <int> | Maximum number of lookup matches per search result when the lookup command is executed | 100 |
The Configuration Name and Index Name parameters are specified when creating a lookup. The remaining parameters are available in the lookup settings on the editor page.
Field Matching Examples
All the examples below use the lookup command to enrich source events with data from the lookup.
General Rules
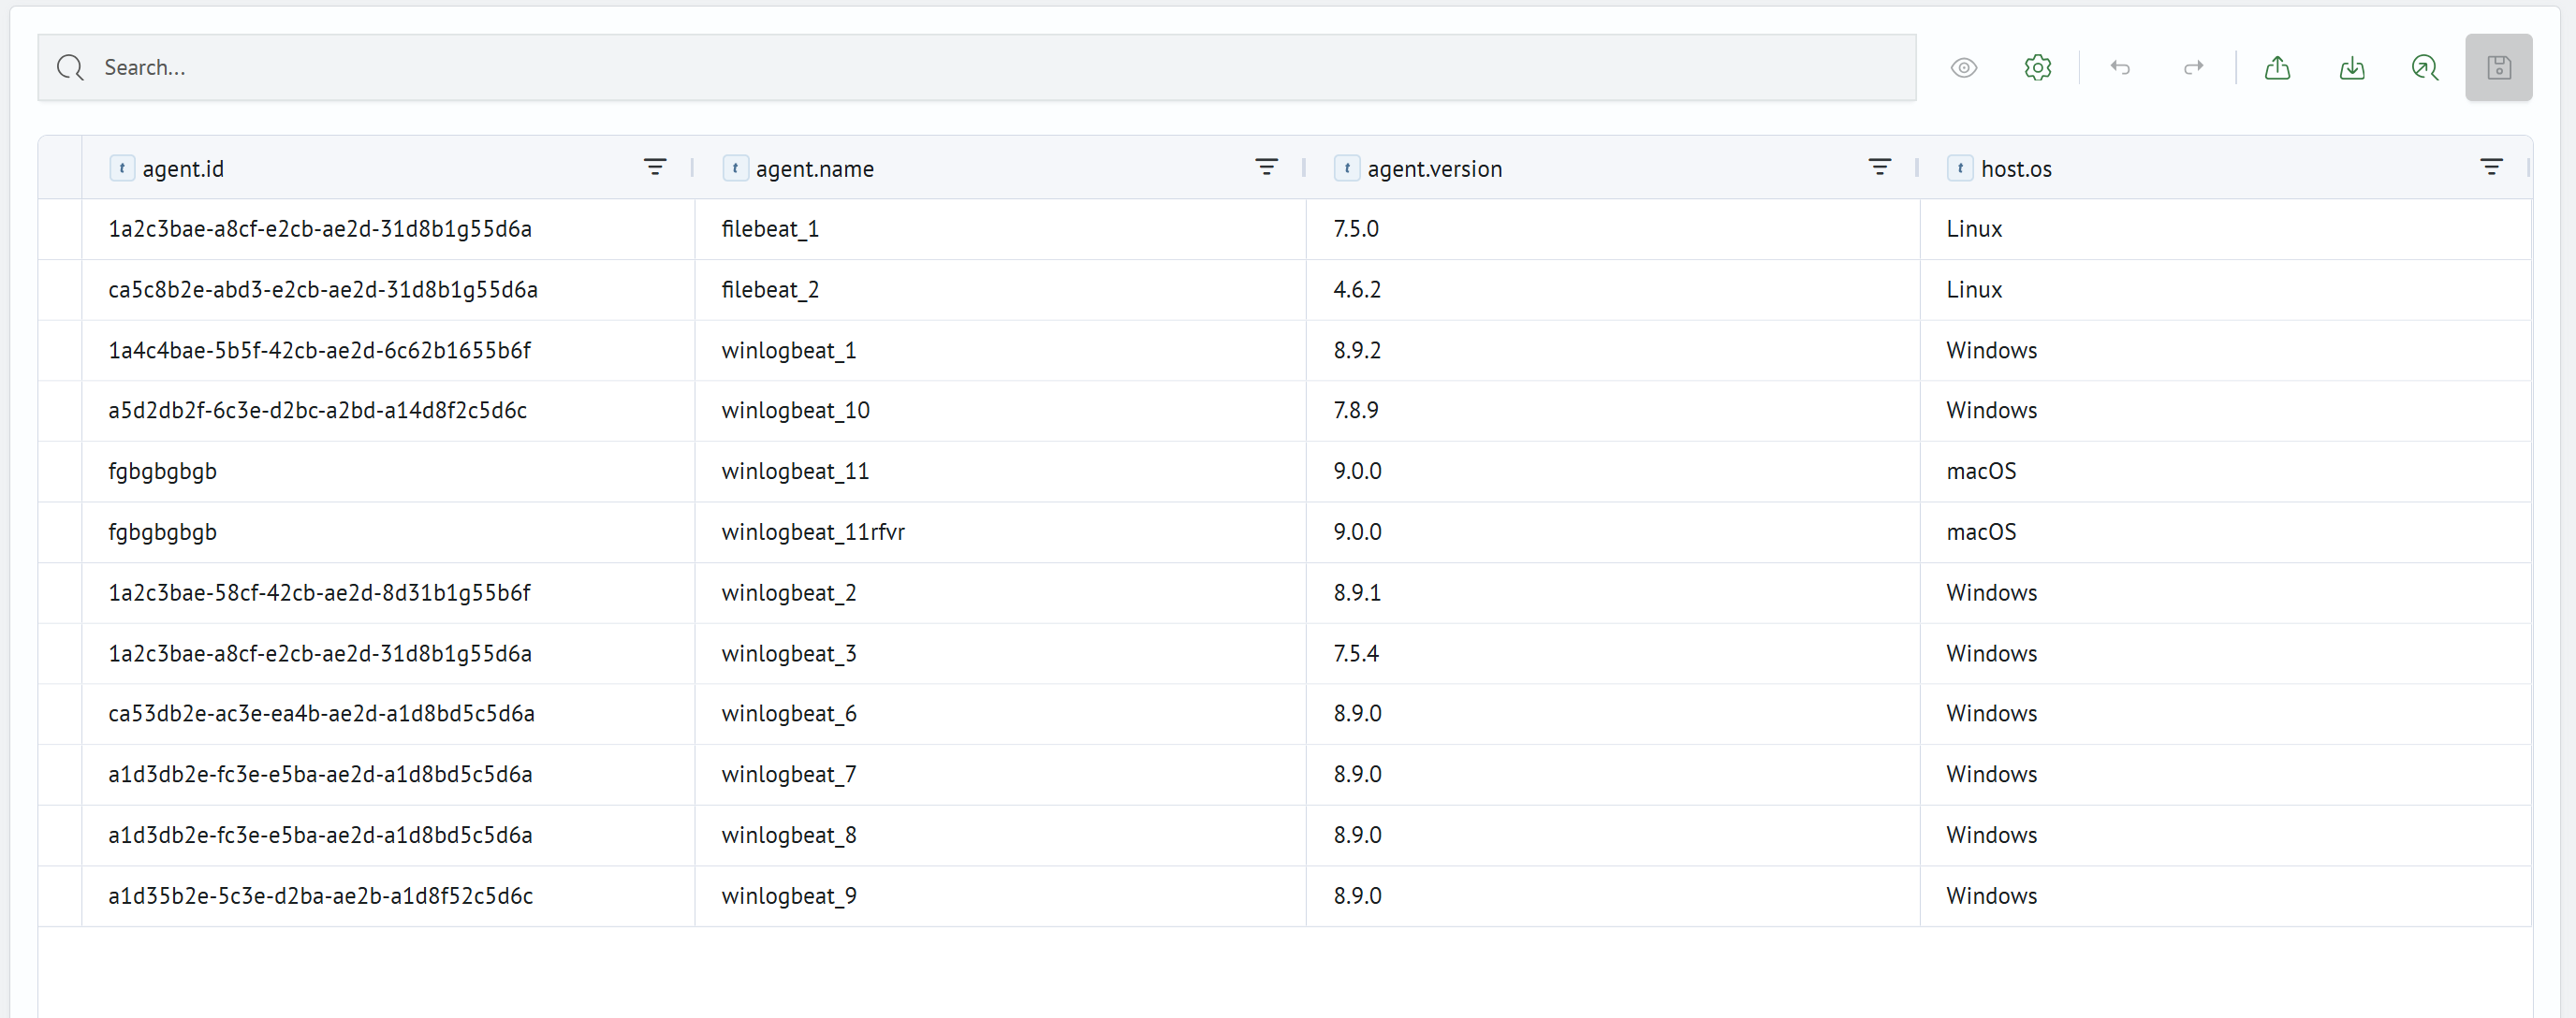
This section provides examples of matching without special rules: a lookup field value exactly matches the value of the corresponding event field. All examples use the following lookup:
Example of Matching a Single Lookup Row
If a single lookup row matches, the source event is enriched with its data:
When executing the following query:
| makeresults
| fields - @timestamp
| eval agent.version="8.9.2"
| lookup agents_info agent.version OUTPUT agent.id, agent.name, host.os
The execution result will be as follows:
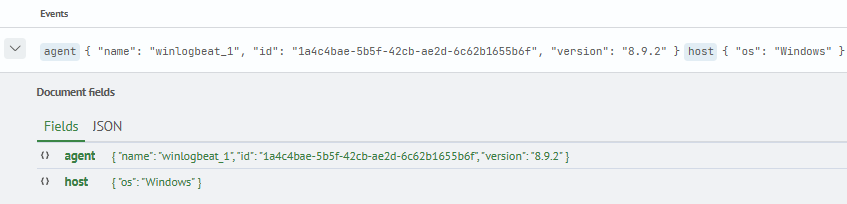
The event was enriched with the fields agent.id, agent.name, and host.os with the corresponding values from the lookup row.
Example of Matching Multiple Lookup Rows
If multiple lookup rows match, the resulting fields are converted into arrays of values from the matching rows:
When executing the following query:
| makeresults
| fields - @timestamp
| eval agent.version="8.9.0"
| lookup agents_info agent.version OUTPUT agent.id, agent.name, host.os
The execution result will be as follows:

The event was enriched with the fields agent.id, agent.name, and host.os with an array of values from the corresponding rows.
Example of No Match in the Lookup
If the lookup fields do not match, the event is not enriched with data:
When executing the following query:
| makeresults
| fields - @timestamp
| eval agent.version="7.5.5"
| lookup agents_info agent.version OUTPUT agent.id, agent.name, host.os
The execution result will be as follows:

The event was not enriched with the fields agent.id, agent.name, and host.os because the lookup does not contain a field agent.version with the required value.
Example of Matching Multiple Lookup Fields
The lookup command supports matching multiple fields to identify more precisely which events should be enriched with data:
When executing the following query:
| makeresults
| fields - @timestamp
| eval agent.version="8.9.0", agent.name="winlogbeat_6"
| lookup agents_info agent.version, agent.name OUTPUT agent.id, host.os
The execution result will be as follows:
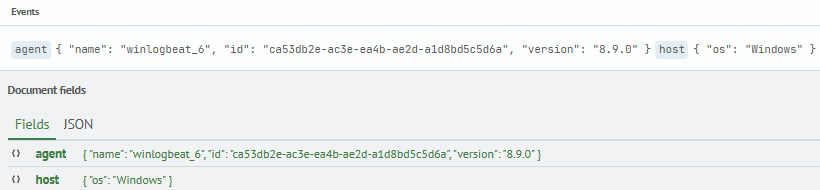
In the multiple-row matching example, matching only agent.version enriches the event with data from multiple rows. Because this example matches both agent.version and agent.name, the event is enriched only with data from the winlogbeat_6 row.
Using a Case-Sensitive Field
In the lookup settings, you can specify case-sensitive fields. This example uses the lookup from General Rules, where the agent.name field is case-sensitive.
When executing the following query:
| makeresults
| fields - @timestamp
| eval agent.name="WinLogBeat_1"
| lookup agents_info agent.name OUTPUT agent.id, agent.version, host.os
The execution result will be as follows:

Data from the lookup row where agent.name has the value winlogbeat_1 was not added to the event.
If the agent.name field were not case-sensitive, the result would be as follows:
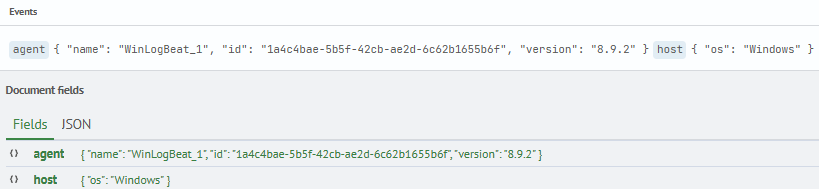
The event was enriched with data from the lookup row where agent.name has the value winlogbeat_1.
Wildcard
In the lookup settings, you can specify fields that will be matched using the Wildcard rule.
The values in the specified field must conform to the wildcard rule.
- Example №1
- Example №2
- Example №3
Lookup for the first example:

The agent.version field is matched using the wildcard principle.
When executing the following query:
| makeresults
| fields - @timestamp
| eval agent.version="4.6.5"
| lookup agents_info agent.version OUTPUT agent.id, agent.name, host.os
The execution result will be as follows:
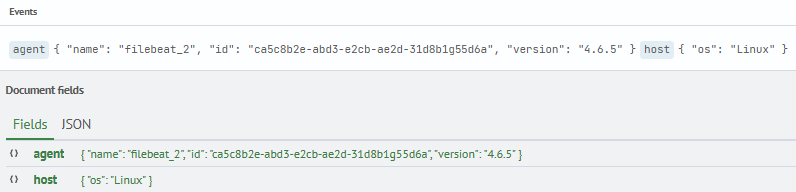
The event was enriched with the fields agent.id, agent.name, and host.os with the corresponding values from the lookup row.
Lookup for the second example:
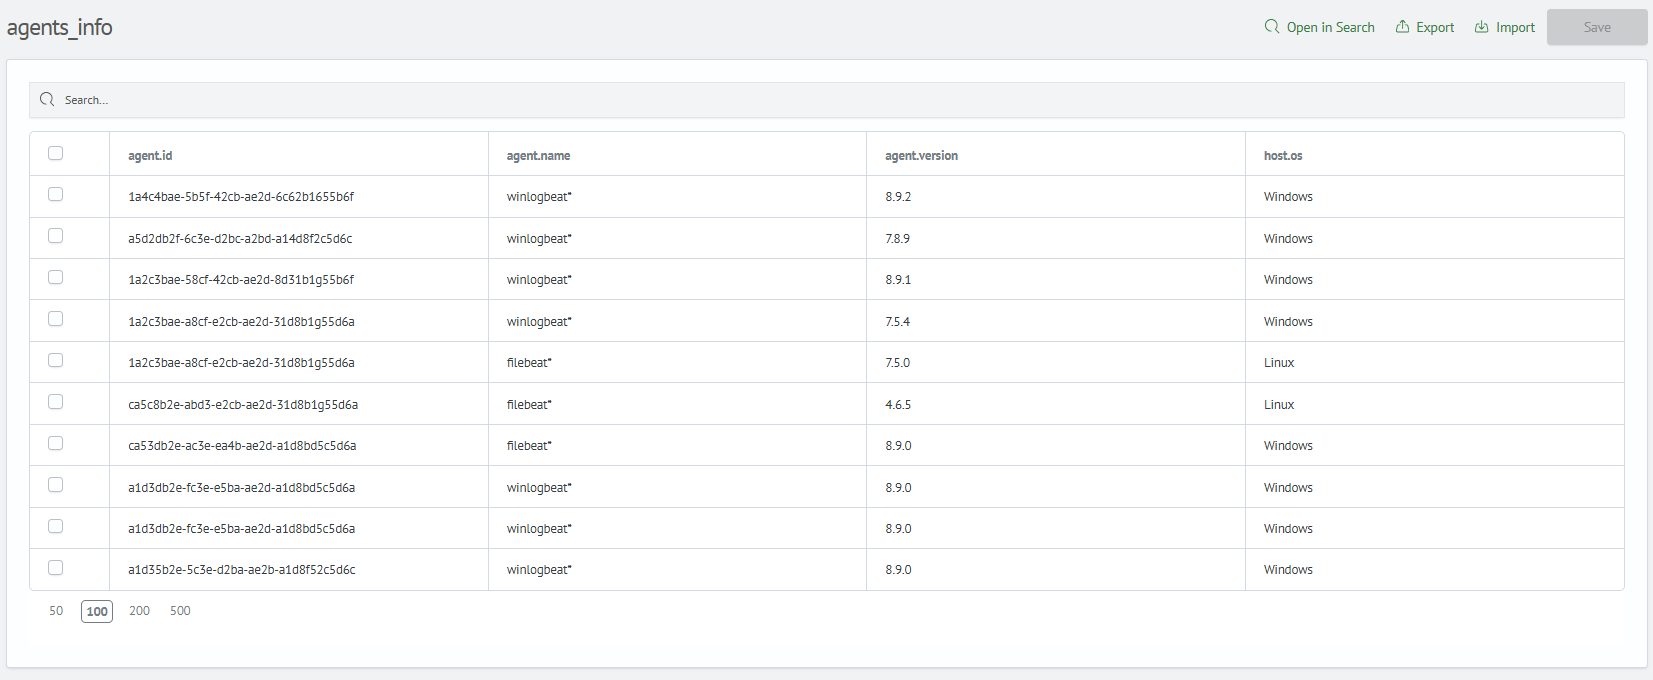
The agent.name field is matched using the wildcard principle.
When executing the following query:
| makeresults
| fields - @timestamp
| eval agent.name="filebeat_1"
| lookup agents_info agent.name OUTPUT host.os, agent.version, agent.id
The execution result will be as follows:

The event was enriched with the fields host.os, agent.version, and agent.id with an array of values from the corresponding rows.
Lookup for the third example:
The agent.version field is matched using the wildcard principle.
When executing the following query:
| makeresults
| fields - @timestamp
| eval agent.version="9.6.0"
| lookup agents_info agent.version OUTPUT agent.id, agent.name, host.os
The execution result will be as follows:

The event was not enriched with the fields agent.id, agent.name, and host.os because the lookup does not contain the agent.version field with the necessary wildcard value.
Cidrmatch
In the lookup settings, you can specify fields that will be matched using the Cidrmatch rule.
The values in the specified field must conform to the cidrmatch rule.
All examples will be based on the following lookup:
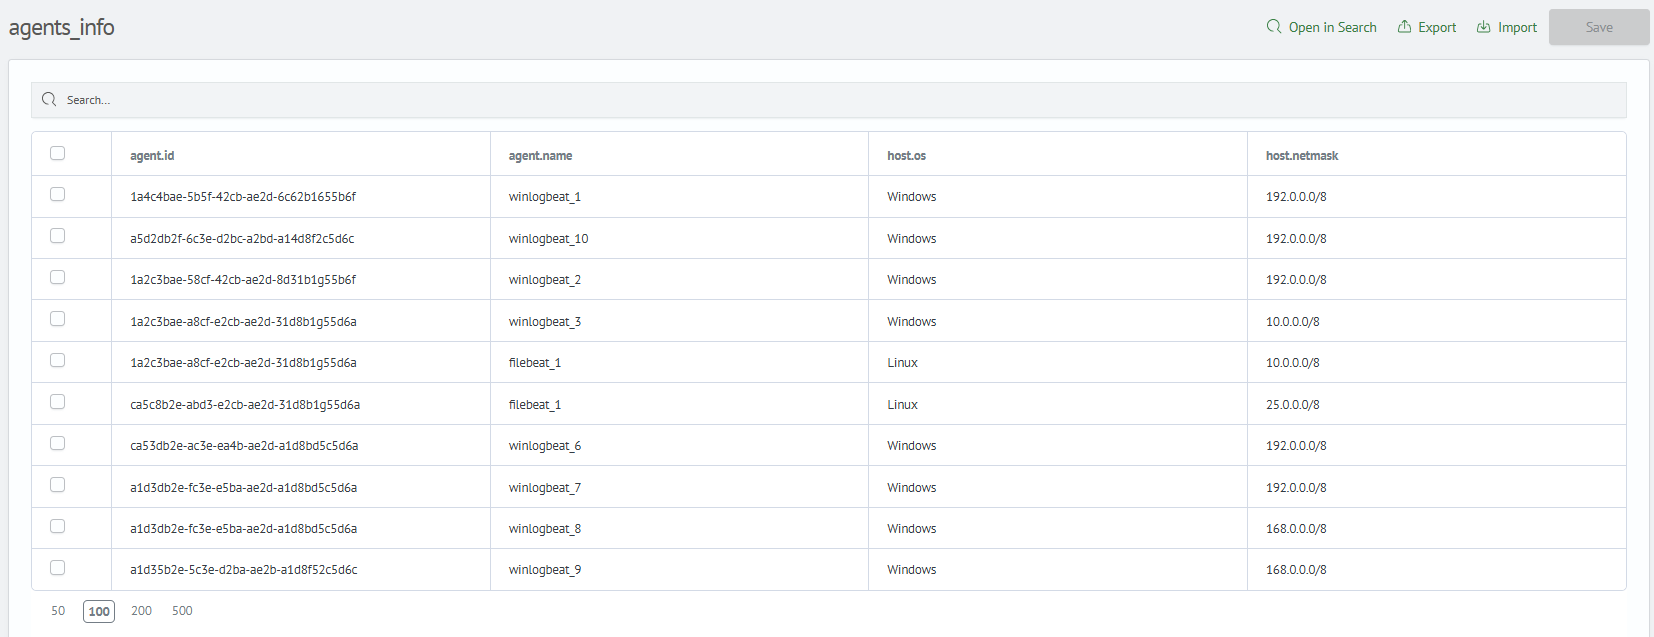
The host.netmask field is matched using the cidrmatch principle.
- Example №1
- Example №2
- Example №3
When executing the following query:
| makeresults
| fields - @timestamp
| eval host.ip="25.22.8.3"
| lookup agents_info host.netmask AS host.ip OUTPUT agent.id, agent.name, host.os, agent.version, host.netmask
The execution result will be as follows:

The event was enriched with the fields agent.id, agent.name, host.os, agent.version, and host.netmask with the corresponding values from the lookup row.
When executing the following query:
| makeresults
| fields - @timestamp
| eval host.ip="192.168.16.8"
| lookup agents_info host.netmask AS host.ip OUTPUT agent.id, agent.name, host.os, agent.version, host.netmask
The execution result will be as follows:

The event was enriched with the fields agent.id, agent.name, host.os, agent.version, and host.netmask with an array of values from the corresponding rows.
When executing the following query:
| makeresults
| fields - @timestamp
| eval host.ip="32.16.8.5"
| lookup agents_info host.netmask AS host.ip OUTPUT agent.id, agent.name, host.os, agent.version, host.netmask
The execution result will be as follows:

The event was not enriched with the fields agent.id, agent.name, host.os, agent.version, and host.netmask because the lookup does not contain the host.netmask field with the necessary cidrmatch value.
Conditions
In the lookup settings, you can specify matching conditions. Set the condition in the Condition field of the Match Rules section. These examples use the lookup from General Rules.
- Example №1
- Example №2
- Example №3
Specify the following condition in the lookup settings:

If accessing a row where agent.name has the value winlogbeat_7, the source event will not be enriched with data.
When executing the following query:
| makeresults
| fields - @timestamp
| eval agent.name="winlogbeat_7"
| lookup agents_info agent.name OUTPUT agent.id, host.os, agent.version
The execution result will be as follows:

The event was not enriched with the fields agent.id, host.os, and agent.version because the search is for a row where agent.name has the value winlogbeat_7, which contradicts the condition specified in the lookup.
Specify the condition from the previous example in the lookup settings.
When executing the following query:
| makeresults
| fields - @timestamp
| eval agent.version="8.9.0"
| lookup agents_info agent.version OUTPUT agent.id, agent.name, host.os, agent.version
The execution result will be as follows:

The event was not enriched with the fields agent.id, agent.name, host.os, and agent.version for rows where agent.name is not winlogbeat_7.
Specify the following condition in the lookup settings:

When executing the following query:
source logs
| lookup agents_info agent.version OUTPUT agent.id, agent.name, host.os
The execution result will be as follows:
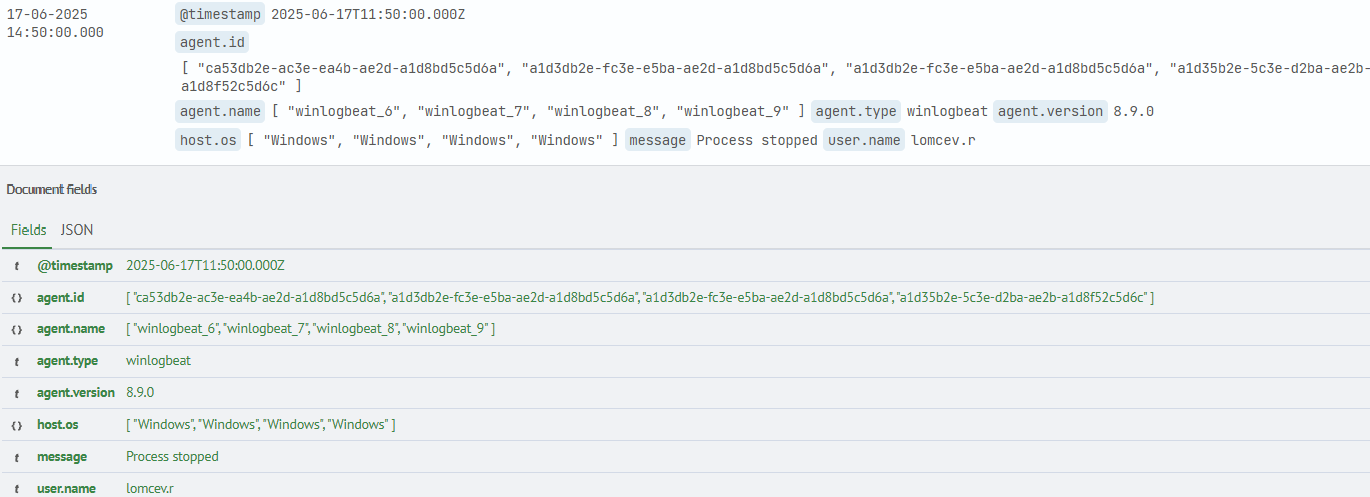
The event was enriched with the fields agent.id, agent.name, and host.os because it meets the lookup condition, namely agent.version has the value 8.9.0 and host.os is Windows.
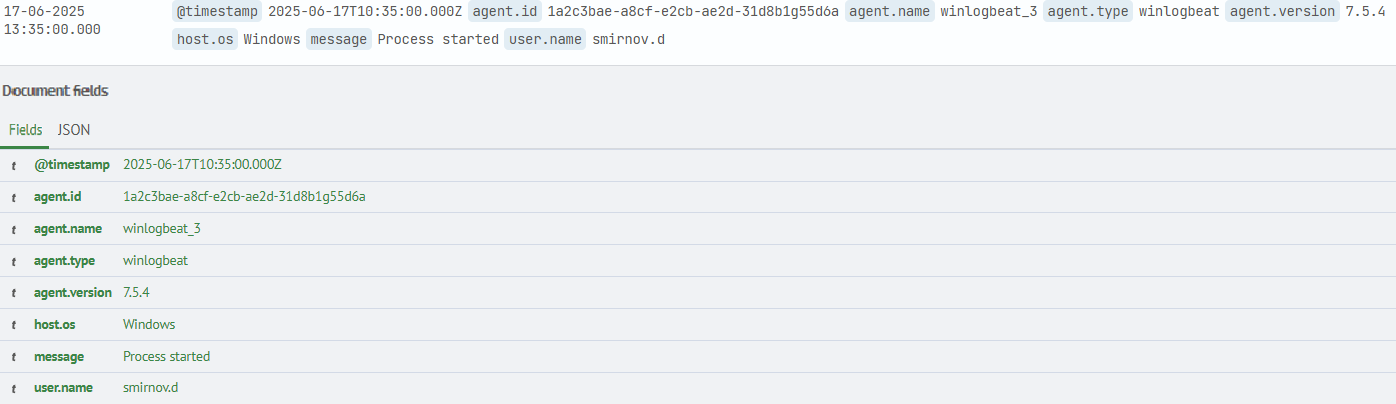
The event was not enriched with the fields agent.id, agent.name, and host.os because host.os has the value Linux, which contradicts the condition specified in the lookup.
Deleting a Lookup
To delete a lookup, open the row actions menu in the lookup list and select Delete. A confirmation dialog appears:
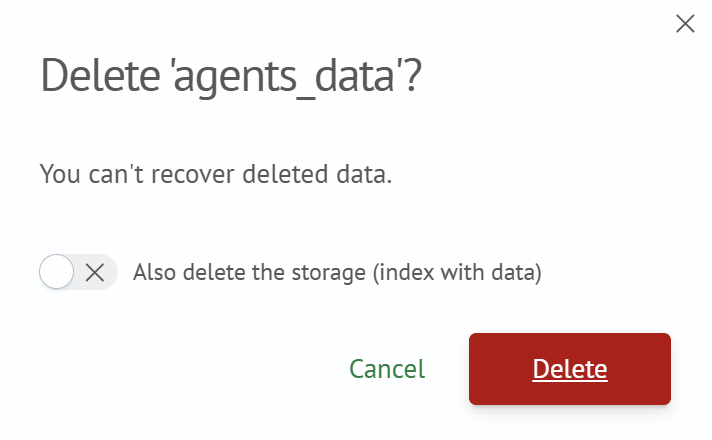
By default, only the lookup configuration is deleted. The Also delete the storage (index with data) toggle additionally deletes the index and its data.
To delete multiple lookups, select them using the checkboxes in the list and click the bulk delete button.
A deleted lookup cannot be restored.