Smart Beat for Windows
Smart Beat can work with any version of ElasticBeat, but if you plan to send these examples to OpenSearch, then the ElasticBeat version should be 7.12.1 (or 7.10.2 is a more stable version). If you plan to use Logstash, then the ElasticBeat version does not matter. Check on the official website.
Symbols
$SB_HOME- Smart Beat installation home directory:C:\Program Files\smartBeat\
Installation using an MSI file
Run the Smart Beat MSI file at a certain bit rate:
- If Windows is x32, you need to run
SmartBeat-windows-x86-version.msi - If Windows is x64, you need to run
SmartBeat-windows-x64-version.msi
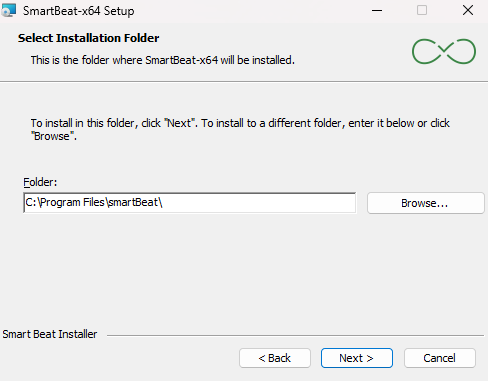
Select the Smart Beat installation path (standard installation path: C:\Program Files\smartBeat):
After the installation is complete, the necessary directories and configuration files for Smart Beat will be created to allow service configuration before it is started.
If any files or directories are missing, they will be created when the service is started. If any file already exists, it will not be created.
Setting up connection to Smart Beat Manager
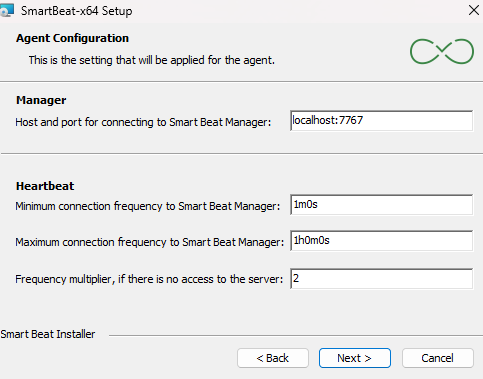
At this stage, you need to configure the following parameters of the Smart Beat configuration file:
| Parameter | Description | Default Value |
|---|---|---|
| Manager | Setting up to connect to Smart Beat Manager. You must specify the IP address or DNS name of the machine where Smart Beat Manager is installed, and the connection port (host and port must be separated by the symbol :). | localhost:7767 |
| Heartbeat | Configuring the Smart Beat connection parts to the Smart Beat Manager. |
Setting up an SSL connection
It is recommended to use a secure connection.
Enter the paths to the certificates to securely connect Smart Beat to Smart Beat Manager:

By default, a secure connection with certificate verification is enabled. To do this, you must specify the path to the CA certificate and the certificate and key of the Smart Beat itself. It is recommended to generate certificates with the following parameters:
keyUsage = critical, digitalSignature, keyEnciphermentextendedKeyUsage = serverAuth, clientAuthSubject Alternative Name- specify all possible IP and domain names of the server where the agent is installed
To generate a certificate, you can use the utility provided in the installer $SM_INSTALLER/utils/ssl-tls-gen/gencerts.sh . In order to disable certificate verification, you need to disable the Enable verification checkbox. To generate self-signed certificates, check the box Generate self-signed certificate. In this case, the CA certificate will not be taken into account and will be ignored. In order not to use a secure connection, uncheck the Enable SSL box.
Log file rotation
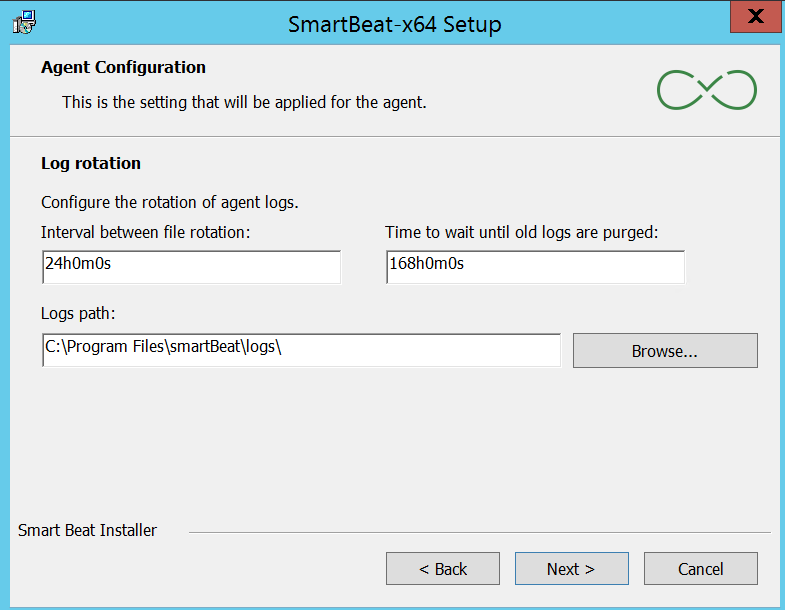
At this step, the parameters responsible for logging are configured:
- Rotation time - the frequency of rotation of the logging file. The default is 24 hours
- Max age - the lifetime of the logging file. The default is 1 week
- Logs path - the directory for saving logs. By default:
C:\Program Files\smartBeat\logs\
Additional Smart Beat Settings
At this step, you can configure the following actions:
- Delete GUID Smart Beat - this action must be performed only when updating Smart Beat. If you perform this action during installation, nothing will happen. Delete the
guid.ymlfile (a file containing a unique Smart Beat identifier) - Set ExecutionPolicy on RemoteSigned - this action must be performed when you are going to configure the collection using Powershell scripts. The policy for the user will change to
RemoteSigned - The salt in the Smart Beat GUID - this action is recommended to avoid duplicates of the Smart Beat GUID installed on different machines that have been copied. Add salt when generating the Smart Beat GUID (the
guid_saltparameter in theconfig.yamlconfiguration file)

After the Smart Beat is configured correctly, run the installation - Install, and when prompted Account Control - Allow this application from an unknown publisher to make changes on your device, click Yes.
After Smart Beat is installed on your computer, the Smart Beat service will start and the agent will connect to Smart Beat Manager.
Quiet installation
To install Smart Bat on Windows using a silent MSI installation, you need to open a command prompt or powershell as an administrator to execute commands.
cd 'C:\<path to SmartBeat-x64.msi>'
msiexec /i SmartBeat-x64.msi /qn
When installing Smart Beat, using a silent MSI installation, you can specify the keys for configuring the MSI. If you do not specify a key, the default value will be applied.
After the installation is complete, the necessary directories and configuration files for Smart Beat will be created to allow service configuration before it is started.
If any files or directories are missing, they will be created when the service is started. If any file already exists, it will not be created.
| Parameter | Description | The default value |
|---|---|---|
GUID_SALT | Adding salt when generating a GUID. Required if you are using virtual machines copied from one. By default, it is empty. It is possible to add <IP> <MAC>, the values are substituted automatically from the current server. | |
APPDIR | Smart Beat installation path | C:\Program Files\smartBeat |
SBMANAGER | Host (IP address or DNS name) and port of Smart Beat Manager. | localhost:7767 |
HEARTBEAT_MIN | Minimum Smart Beat connection frequency. | 1m0s (1 minute) |
HEARTBEAT_MULTIPLIER | The multiplier of the minimum connection frequency. | 2 |
HEARTBEAT_MAX | The maximum connection frequency of the Smart Beat. | 1h0m0s (1 hour) |
ROTATION_INTERVAL | The frequency of rotation of the logging file. | 24h (24 hours) |
ROTATION_AGE | The lifetime of the logging file. | 168h (1 week) |
ROTATION_LOG_LEVEL | Logging mode (info/debug/trace) Smart Beat. | info |
ROTATION_LOG_PATH | Directory for saving logs. | C:\Program Files\smartBeat\logs\ |
SSL_VERIFY | Secure connection to Smart Beat Manager. | false |
SSL_ENABLE | Protocol for connecting to Smart Beat Manager, where the https protocol is used when set to true, and the http protocol is used when set to false. | true |
SSL_CERT_CA | The absolute/relative path to the certificate CA. | |
SSL_CERT_NODE | The absolute/relative path where the node certificate will be generated. The system searches for the certificate file at the specified path. If the file is not found and the ssl.enabled parameter is set to true, a self-signed certificate is automatically generated. | C:/Program Files/smartBeat/cert/node-cert.pem |
SSL_KEY_NODE | The absolute/relative path where the node key will be generated. The system searches for the key file at the specified path. If the file is not found and the ssl.enabled parameter is set to true, a self-signed key is automatically generated. | C:/Program Files/smartBeat/cert/node-key.pem |
REMOVE_GUID | Delete the guid.yml file. | false |
SSL_CERT_CA_CONTENT | Content of the file specified in the SSL_CERT_CA parameter. | Empty string |
SSL_CERT_NODE_CONTENT | Content of the file specified in the SSL_CERT_NODE parameter. | Empty string |
SSL_KEY_NODE_CONTENT | Content of the file specified in the SSL_KEY_NODE parameter. | Empty string |
FORMAT_CONTENT | Format the content of SSL_*_CONTENT parameters before writing to files. | false |
It is not necessary to specify all the parameters, it is enough to specify only which ones need to be changed.
An example of using keys when installing MSI silently on Windows x64 using powershell:
msiexec /i SmartBeat-windows-x64-version.msi /qn APPDIR=`"C:\Program Files\smartBeat`" GUID_SALT="<IP>_<MAC>" SBMANAGER="localhost:7767" HEARTBEAT_MIN="1m0s" HEARTBEAT_MULTIPLIER=2 HEARTBEAT_MAX="1h0m0s" ROTATION_INTERVAL="24h" ROTATION_AGE="168h" ROTATION_LOG_LEVEL=info ROTATION_LOG_PATH=`"C:\Program Files\smartBeat\logs`" SSL_VERIFY=true SSL_ENABLE=true SSL_CERT_CA=`"C:\Program Files\smartBeat\cert\ca-cert.pem`" SSL_CERT_NODE=`"C:\Program Files\smartBeat\cert\cert.pem`" SSL_KEY_NODE=`"C:\Program Files\smartBeat\cert\key.pem`" REMOVE_GUID=false SET_EXECUTION_POLICY=false
When using a space character in the value of one of the parameters, it is necessary to specify the value in double quotes with escaping using the ` character. For example:
APPDIR=`"C:\Program Files\smartBeat`"
An example of using the keys when quietly installing MSI on Windows x64 using the command line:
msiexec /i SmartBeat-windows-x64.msi /qn APPDIR="C:\Program Files\smartBeat\" GUID_SALT="<IP>_<MAC>" SBMANAGER="localhost:7767" HEARTBEAT_MIN="1m0s" HEARTBEAT_MULTIPLIER=2 HEARTBEAT_MAX="1h0m0s" ROTATION_INTERVAL="24h" ROTATION_AGE="168h" ROTATION_LOG_LEVEL=info ROTATION_LOG_PATH="C:\Program Files\smartBeat\logs\" SSL_VERIFY=false SSL_ENABLE=true SSL_CERT_CA="C:\Program Files\smartBeat\cert\ca-cert.pem" SSL_CERT_NODE="C:\Program Files\smartBeat\cert\cert.pem" SSL_KEY_NODE="C:\Program Files\smartBeat\cert\key.pem" REMOVE_GUID=false SET_EXECUTION_POLICY=false
Additional Smart Beat Settings
Replacing certificates
To replace the Smart Beat certificates and private key, follow these steps:
- Stop the Smart Beat service
- In the
${SB_HOME}/cert/directory, delete all existing certificates and private keys - Transfer the existing CC certificate, certificate and Smart Beat private key to the same directory
${SB_HOME}/cert/ - Edit, if necessary, the configuration file
${SB_HOME}/config/config.yaml:ssl.cert_ca- specify the name of the CA's x509 certificatessl.node_certis the file name of the x509 Smart Beat certificatessl.node_keyis the file name of the Smart Beat private keyssl.enable: true- enable SSL/TLSssl.verify: true- enable certificate validation
- Launch the Smart Beat service
User Change
In order to change the user under which Smart Beat works, you need to do the following:
- Turn off the Smart Beat service
- Change the owner of the directory
${SB_HOME}and all attached files and directories - Add permission to read all necessary files to the new Smart Beat user
- Launch the
Local Security Policy, openSecurity Settings-Local Policies-Assigning user rights-Logging in as a service- add a new Smart Beat user - Launch the Smart Beat service
Changing the GUID
The GUID is formed based on the UUID of the disk that is mounted on the root of the file system. At startup, Smart Beat calculates the GUID and in the absence of the file ${SB_HOME}/config/guid.yml stores the received value in it. With an existing file, it compares the received value and the value in the file and writes the result in a log file.
If the virtual servers were cloned, then a situation may arise in which the UUIDs will be the same, for this you should add salt when generating the GUID. In the configuration file ${SB_HOME}/config/config.yaml, you need to add the parameter guid_salt. Currently, you can add 2 tokens, which are calculated for each server:
<IP>- substitutes the IP address from which themanager.hostserver is accessed or the value from theagent.ipparameter is taken (must be real, otherwise it will be selected randomly)<MAC>- substitutes the MAC of a network device that has the IP address obtained above
To change the Smart Beat GUID, follow these steps:
- Stop the Smart Beat service
- Delete the file
${SB_HOME}/config/guid.yml - Edit the configuration file
${SB_HOME}/config/config.yamland make changes to the parameterguid_salt- specify the necessary "salt", it is recommended to use the value from the tokens<IP> <MAC> - Launch the Smart Beat service
Description of the configuration file
The configuration file ${SB_HOME}/config/config.yaml consists of the following parameters:
| Parameter | Description | Default value |
|---|---|---|
guid_salt | Salt when generating GUID for Smart Beat. | <IP> <MAC> |
heartbeat.min_condition | The minimum connection frequency of Smart Beat. | 1m0s (1 minute) |
heartbeat.min_condition | The minimum connection frequency of Smart Beat. | 1m0s (1 minute) |
heartbeat.multiplier | Multiplier of the minimum connection frequency. | 2 |
heartbeat.max_condition | The maximum connection frequency. | 1h0m0s (1 hour) |
manager.host | Host (IP address or DNS name) Smart Beat Manager. | localhost |
manager.port | Port of Smart Beat Manager. | 7767 |
agent.ip | The IP address of the agent. It is used in the case of multiple network interfaces to select the agent`s IP address to be sent to the Smart Beat Manager. The specified IP address must be assigned to one of the host's network interfaces, otherwise the parameter will be filled with the default value. An optional parameter. | The IP address of the network interface of the host through which the request to the Smart Beat Manager passes. |
agent.tags | An array of agent labels. An optional parameter. | [] |
agent.send_addrs | Enabling sending information about the host's network interfaces. If the value is true, then an array of addrs objects will be sent to Smart Beat Manager, where each object consists of three fields inter - the interface name, hwaddr - the physical address of the interface, ipv4 - the ip address assigned to the interface. An optional parameter. | true |
rotation.rotation_time | The frequency of rotation of the logging file. | 24h (24 hours) |
rotation.max_age | Lifetime of the logging file. | 168h (1 week) |
rotation.max_size | Limit the size of the logging file. | 10485760 (10 MB) |
rotation.log_level | Logging level. It can take the values trace, debug, info, warn, error, fatal. It is recommended to use the debug level for debugging. | info |
rotation.log_path | Directory for saving logs. | ./logs |
ssl.verify | Checking ssl certificates when securely connected to Smart Beat Manager. | false |
ssl.enable | Secure connection to Smart Beat Manager. | true |
ssl.cert_ca | Path to the CA of the certificate. | ./cert/ca-cert.pem |
ssl.node_cert | Path to generate the node certificate. | ./cert/node-cert.pem |
ssl.node_key | Path to generate the node key. | ./cert/node-key.pem |