Smart Beat for Windows
Smart Beat can work with any version of ElasticBeat, but if you plan to send these examples to OpenSearch, then the ElasticBeat version should be 7.12.1 (or 7.10.2 is a more stable version). If you plan to use Logstash, then the ElasticBeat version does not matter. Check on the official website.
Symbols
$SB_HOME- Smart Beat installation home directory:C:\Program Files\smartBeat\
Installation using an MSI file
Run the Smart Beat MSI file at a certain bit rate:
- If Windows is x32, you need to run SmartBeat-x32.msi.
- If Windows is x64, you need to run SmartBeat-x64.msi.
- Or you can run the SmartBeat.exe file (universal Smart Beat installer) — it will automatically select the required MSI.

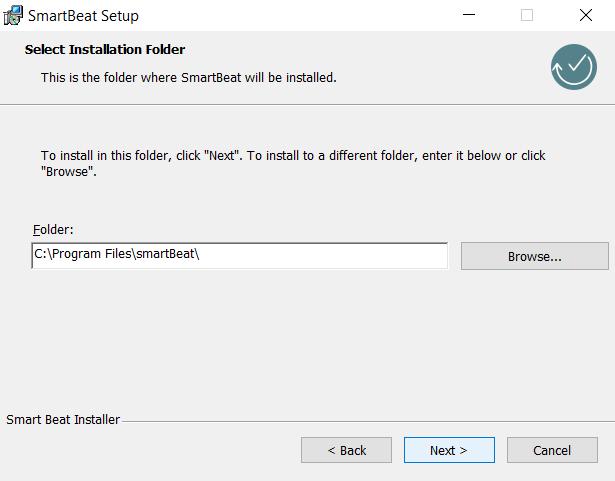
Select the Smart Beat installation path (standard installation path: C:\Program Files\smartBeat):
Setting up connection to Smart Beat Manager
At this stage, you need to configure the following parameters of the Smart Beat configuration file:
| Parameter | Description | Default Value |
|---|---|---|
| Manager | Setting up to connect to Smart Beat Manager. You must specify the IP address or DNS name of the machine where Smart Beat Manager is installed, and the connection port (host and port must be separated by the symbol :). | localhost:7767 |
| Heartbeat | Configuring the Smart Beat connection parts to the Smart Beat Manager. |

Setting up an SSL connection
It is recommended to use a secure connection.
Enter the paths to the certificates to securely connect Smart Beat to Smart Beat Manager:

If you have chosen a secure connection, you must specify the path to the CA certificate and key so that Smart Beat can use them for connection, and also generate node-cert.pem and node-key.pem signed by the CA certificate and key.
The node-cert.pem and node-key.pem keys are created automatically: either based on the provided Certificate Authority (CA) certificate and private key, or, if they are not available, a self-signed private key and CA certificate are generated. The SmartBeat certificate and private key are then generated from the latter.
If you need to use existing Smart Beat certificates and private key, leave the fields blank at this stage to generate a self-signed private key and CA certificate. You will then need to delete them and replace them with your existing certificates and private key.
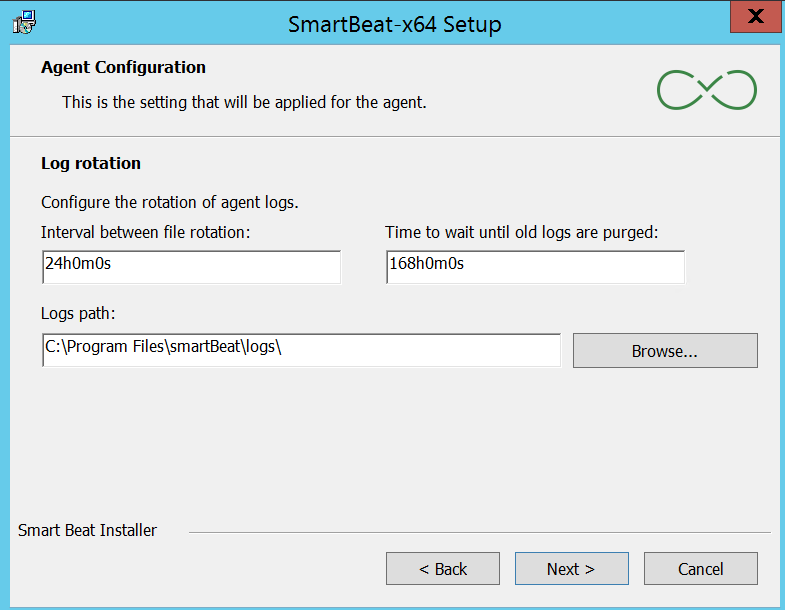
Log file rotation
At this step, the parameters responsible for logging are configured Smart Beat:
- Rotation time - the frequency of rotation of the logging file. The default is 24 hours
- Max age - the lifetime of the logging file. The default is 1 week
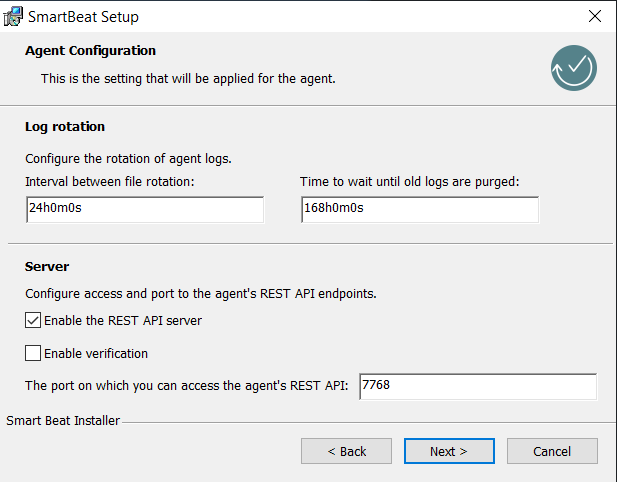
If you want to enable access to the Smart Beat REST API, you must select either a secure or non-secure connection (using a secure connection is recommended), as well as the REST API listening port.
When selecting a secure connection to the REST API, Smart Beat will use the CA certificate and key that were configured during the SSL connection setup step.
Additional Smart Beat Settings
At this step, you can configure the following actions:
- Delete GUID Smart Beat - this action must be performed only when updating Smart Beat. If you perform this action during installation, nothing will happen. Delete the guid.yml file (a file containing a unique Smart Beat identifier)
- Set ExecutionPolicy on RemoteSigned - this action must be performed when you are going to configure the collection using Powershell scripts. The policy for the user will change to RemoteSigned
- The salt in the Smart Beat GUID - this action is recommended to avoid duplicates of the Smart Beat GUID installed on different machines that have been copied. Add salt when generating the Smart Beat GUID (the guid_salt parameter in the config.yaml configuration file)

After the Smart Beat is configured correctly, run the installation - Install, and when prompted Account Control - Allow this application from an unknown publisher to make changes on your device, click Yes.
After Smart Beat is installed on your computer, the Smart Beat installer should display a window as shown in the figure below. Upon successful installation, the Smart Beat service will start and the agent will connect to Smart Beat Manager.
To use existing SmartBeat certificates and private key, follow these steps:
- Stop the SmartBeat service via Windows Services
- In the
${HOME_SB}/cert/directory, delete all existing certificates and private keys - Move the existing CA certificate, SmartBeat certificate, and private key to the same directory:
${HOME_SB}/cert/ - Edit the configuration file
${HOME_SB}/config/config.yamlif necessary - Start the SmartBeat service via Windows Services
To change the user under which SmartBeat runs, follow these steps:
- Stop the SmartBeat service
- Change the owner of the
${HOME_SB}directory and all its subdirectories and files - Grant the new SmartBeat user read permissions for all necessary files
- Open "Local Security Policy", navigate to "Security Settings -> Local Policies -> User Rights Assignment -> Log on as a service" - add the new SmartBeat user
- Start the SmartBeat service and check the logs
Quiet installation
To install Smart Bat on Windows using a silent MSI installation, you need to open a command prompt or powershell as an administrator to execute commands.
Installing Smart Beat on Windows x32
cd 'C:\<путь к SmartBeat-x32.msi>'
msiexec /i SmartBeat-x32.msi /qn
Installing Smart Beat on Windows x64
cd 'C:\<путь к SmartBeat-x64.msi>'
msiexec /i SmartBeat-x64.msi /qn
When installing Smart Beat, using a silent MSI installation, you can specify the keys for configuring the MSI. If you do not specify a key, the default value will be applied.
| Parameter | Description | The default value |
|---|---|---|
GUID_SALT | Adding salt when generating a GUID. Required if you are using virtual machines copied from one. By default, it is empty. It is possible to add <IP> <MAC>, the values are substituted automatically from the current server. | |
APPDIR | Smart Beat installation path | C:\Program Files\smartBeat |
SBMANAGER | Host (IP address or DNS name) and port of Smart Beat Manager. | localhost:7767 |
HEARTBEAT_MIN | Minimum Smart Beat connection frequency. | 1m0s (1 minute) |
HEARTBEAT_MULTIPLIER | The multiplier of the minimum connection frequency. | 2 |
HEARTBEAT_MAX | The maximum connection frequency of the Smart Beat. | 1h0m0s (1 hour) |
ROTATION_INTERVAL | The frequency of rotation of the logging file. | 24h (24 hours) |
ROTATION_AGE | The lifetime of the logging file. | 168h (1 week) |
ROTATION_LOG_LEVEL | Logging mode (info/debug/trace) Smart Beat. | info |
REST_ENABLE | Access to Smart Beat REST API endpoints. | false |
REST_PORT | Port for connecting to the Smart Beat REST API. | 7768 |
SSL_VERIFY | Secure connection to Smart Beat Manager. | false |
SSL_ENABLE | Protocol for connecting to Smart Beat Manager, where the https protocol is used when set to true, and the http protocol is used when set to false. | true |
SSL_CERT_CA | The absolute/relative path to the certificate CA. | |
SSL_CERT_NODE | The absolute/relative path where the node certificate will be generated. The system searches for the certificate file at the specified path. If the file is not found and the ssl.enabled parameter is set to true, a self-signed certificate is automatically generated. | C:/Program Files/smartBeat/cert/node-cert.pem |
SSL_KEY_NODE | The absolute/relative path where the node key will be generated. The system searches for the key file at the specified path. If the file is not found and the ssl.enabled parameter is set to true, a self-signed key is automatically generated. | C:/Program Files/smartBeat/cert/node-key.pem |
REMOVE_GUID | Delete the guid.yml file. | false |
SET_EXECUTION_POLICY | Change the execution policy to allow running PowerShell scripts. | false |
An example of using keys when installing MSI silently on Windows x32 using powershell:
msiexec /i SmartBeat-x32.msi /qn APPDIR=`"C:\Program Files\smartBeat\`" GUID_SALT="<IP>_<MAC>" SBMANAGER="localhost:7767" HEARTBEAT_MIN="1m0s" HEARTBEAT_MULTIPLIER=2 HEARTBEAT_MAX="1h0m0s" ROTATION_INTERVAL="24h" ROTATION_AGE="168h" ROTATION_LOG_LEVEL=info REST_ENABLE=false REST_PORT=7768 REST_VERIFY=false SSL_VERIFY=false SSL_ENABLE=true SSL_CERT_CA="./cert/ca-cert.pem" SSL_KEY_CA="./cert/ca-key.pem" SSL_CERT_NODE="./cert/node-cert.pem" SSL_KEY_NODE="./cert/node-key.pem" REMOVE_GUID=false SET_EXECUTION_POLICY=false
An example of using keys when installing MSI silently on Windows x64 using powershell:
msiexec /i SmartBeat-x64.msi /qn APPDIR=`"C:\Program Files\smartBeat\`" GUID_SALT="<IP>_<MAC>" SBMANAGER="localhost:7767" HEARTBEAT_MIN="1m0s" HEARTBEAT_MULTIPLIER=2 HEARTBEAT_MAX="1h0m0s" ROTATION_INTERVAL="24h" ROTATION_AGE="168h" ROTATION_LOG_LEVEL=info REST_ENABLE=false REST_PORT=7768 REST_VERIFY=false SSL_VERIFY=false SSL_ENABLE=true SSL_CERT_CA="./cert/ca-cert.pem" SSL_KEY_CA="./cert/ca-key.pem" SSL_CERT_NODE="./cert/node-cert.pem" SSL_KEY_NODE="./cert/node-key.pem" REMOVE_GUID=false SET_EXECUTION_POLICY=false
When using a space character in the value of one of the parameters, it is necessary to specify the value in double quotes with escaping using the ` character. For example:
APPDIR=`"C:\Program Files\smartBeat`"
An example of using the keys when quietly installing MSI on Windows x32 using the command line:
msiexec /i SmartBeat-x32.msi /qn APPDIR="C:\Program Files\smartBeat\" GUID_SALT="<IP>_<MAC>" SBMANAGER="localhost:7767" HEARTBEAT_MIN="1m0s" HEARTBEAT_MULTIPLIER=2 HEARTBEAT_MAX="1h0m0s" ROTATION_INTERVAL="24h" ROTATION_AGE="168h" ROTATION_LOG_LEVEL=info REST_ENABLE=false REST_PORT=7768 REST_VERIFY=false SSL_VERIFY=false SSL_ENABLE=true SSL_CERT_CA="./cert/ca-cert.pem" SSL_KEY_CA="./cert/ca-key.pem" SSL_CERT_NODE="./cert/node-cert.pem" SSL_KEY_NODE="./cert/node-key.pem" REMOVE_GUID=false SET_EXECUTION_POLICY=false
An example of using the keys when quietly installing MSI on Windows x64 using the command line:
msiexec /i SmartBeat-x64.msi /qn APPDIR="C:\Program Files\smartBeat\" GUID_SALT="<IP>_<MAC>" SBMANAGER="localhost:7767" HEARTBEAT_MIN="1m0s" HEARTBEAT_MULTIPLIER=2 HEARTBEAT_MAX="1h0m0s" ROTATION_INTERVAL="24h" ROTATION_AGE="168h" ROTATION_LOG_LEVEL=info REST_ENABLE=false REST_PORT=7768 REST_VERIFY=false SSL_VERIFY=false SSL_ENABLE=true SSL_CERT_CA="./cert/ca-cert.pem" SSL_KEY_CA="./cert/ca-key.pem" SSL_CERT_NODE="./cert/node-cert.pem" SSL_KEY_NODE="./cert/node-key.pem" REMOVE_GUID=false SET_EXECUTION_POLICY=false